Painting Predreadnought Warships
A great
variety of color schemes was used on warships between 1885 and 1918, but in general these schemes tended to use similar basic
colors. Many fleets used bright color schemes for peacetime and more drab color
scheme for wartime. Peacetime colors tended to be black, white, light grey
and/or ochre. Wartime colors were usually some shade of grey as were most vessels after 1905.
Below is a table of the colors we use to paint WTJ fleets, followed by more
nationality-specific outlines.
| Paint Type |
Usage |
| Manufacturer |
Number |
Color |
General
Notes |
| Vallejo |
951 |
White |
Common
lifeboat color |
| Vallejo |
950 |
Black |
|
| |
|
|
|
| Vallejo |
862 |
Black Grey |
|
| Vallejo |
870 |
Medium Sea
Grey |
|
| Vallejo |
991 |
Dark Sea Grey |
|
| Vallejo |
992 |
Neutral
Grey |
|
| Vallejo |
883 |
Silver Grey |
|
| Vallejo |
913 |
Yellow
Ochre |
|
| Vallejo |
967 |
Olive Green |
|
| Vallejo |
866 |
Grey
Green |
|
| Vallejo |
821 |
German Beige |
|
| Vallejo |
872 |
Chocolate
Brown |
|
| Vallejo |
898 |
Dark Sea Blue |
Used to paint sea texturing
for bases |
| Vallejo |
540 |
Matte Medium
(primer) |
Used as
undercoat for paint |
| Vallejo |
520 |
Matte Varnish (sealer) |
Used to seal painted ship |
| Vallejo |
510 |
Gloss
Varnish (sealer) |
Used to seal
textured base |
| Vallejo |
400 |
Plastic Putty |
Used for sea texturing
model base |
| Citadel
Colours |
61-17 |
Bleached
Bone |
Good deck
color, but discontinued |
| Vallejo (custom) |
- |
Buff & Silver Grey |
Custom deck color: x2 parts
buff, x1 part silver grey |
|
- Predreadnought Ship Colors by Nationality
- Japan
- Peacetime: Black hull, funnels and ventilators with white
upperworks and turrets. Masts would be black or have black bases and ochre
tops. One to three white I.D. bands around upper 1/3 of funnels. Wartime:
Neutral grey (992) all over with top 20% of funnel black. Some larger vessels
had their mast tops painted black down to a point even with the black funnel
bands.
- Russia
- Peacetime: Most ships had white hulls with ochre funnels
and a black band around the top 25% of each funnel. Wartime: The Baltic Fleet
– including those ships which sailed to Tsushima – had black hulls
with ochre funnels and a black band around the top 25% of each funnel.
War time colors used by the Pacific Fleet are still somewhat of a
mystery. Several years ago some sources began recommending olive green as the
color, and I have seen many model kits over the past few years showing Russian
ships painted a bright olive green. I believe this is incorrect for the
following reasons: An eyewitness US naval officer named McCulley reported that
the Port Arthur squadron began the war painted a very dark cinnamon color
(painted over the top of their white/ochre peacetime livery). This was probably
meant to be the same black as the Baltic Fleet, but black paint at that time
actually used lamp black as a pigment, and lamp black often had a
brownish hue when impurities were present (which was often). It is entirely
possible - and even likely in light of McCulley's account - that the Port
Arthur facility did not have access to a quality stock of high-grade black
paint, hence the "cinnamon" hue of the early war paint scheme.
Later in
1904 the upperworks (funnels and superstructure) were painted a lighter color
and the rest of the ship painted a medium shade, giving a two-tone color
scheme. This actually shows in several photos of the ships sunk at their
moorings, and McCulley noted that later in the war, the Russians re-painted
their ships to match the "russet" color of the surrounding mountains. This is
most likely the olive green color alluded to in more recent articles (the logic
being that when you mix black and ochre, you get olive green). However I have
run several color matching tests and discovered that when you mix impure lamp
black (with the dark brown impurities) you do not get olive green, you get
olive drab and a completely different look. By mixing some white into the olive
drab, you then get khaki, the "russet" color referred to by McCulley. So my
belief is that the two-toned color livery of the late war Port Arthur squadron
was probably khaki and olive-drab, both of which can be arrived at by mixing
various ratios of impure lamp black, ochre and white.
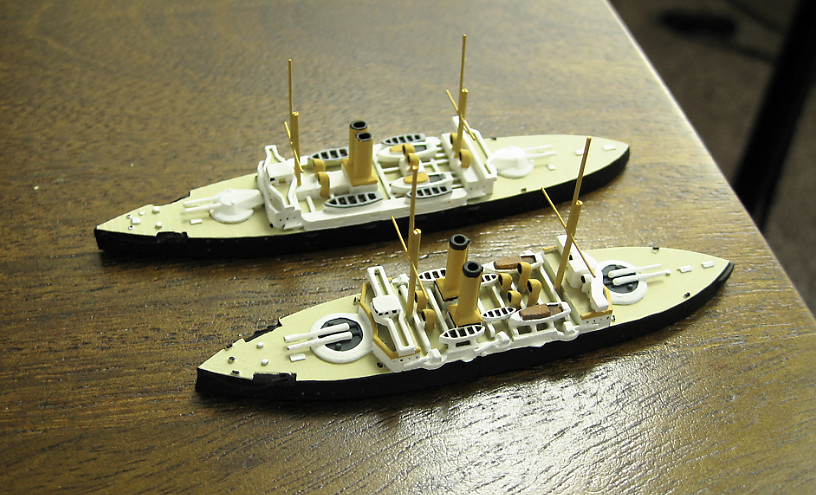
Given the
previous outline, the color I've settled on for the Port Arthur squadron's
early war lamp-black scheme is one part chocolate-brown (872) to one part
black-grey (862). People who prefer a richer, darker color can use black red
(859) instead of chocolate brown. Or you can use a higher proportion of
black-grey in the mix – maybe 3:2 – for a slightly darker, grayer
appearance.
The colors I've settled on for the two-toned livery for
late siege Port Arthur ships are: Two parts olive-green (967), two parts
chocolate-brown (872), one part silver-grey (883) and one part neutral grey
(992) for the olive-drab hull and one part chocolate brown (872), one part
ochre (913), two parts silver grey (883) and two parts medium sea grey (870)
for the khaki upperworks. You can use German Beige (821) to avoid mixing
altogether, it gives a slightly darker, yellower khaki but it's very close. I
use olive-drab all over for the Vladivostok cruisers and khaki all over for the
smaller cruisers at Port Arthur.
Port Arthur Squadron - Custom
Colors
| |
Vallejo Paints |
| SHIP COLOR |
Chocolate
Brown |
Ochre |
Olive
Green |
Silver
Grey |
Neutral
Grey |
Med Sea
Grey |
Black
Grey |
| Olive Drab |
2 |
- |
2 |
1 |
1 |
- |
- |
| Khaki |
1 |
1 |
- |
2 |
- |
1 |
- |
| Lamp Black |
1 |
- |
- |
- |
- |
- |
1 |
| |
|
|
|
|
|
|
|
|
- Spain
- Peacetime: Most ships had a black hull with white
upperworks (superstructure) and ochre funnels. Some light vessels were seen to
have all white hulls and upperworks with ochre funnels. Wartime: No special
wartime colors are known.
- United States
- During peacetime US ships tended to have white hulls with
ochre upperworks and funnels. The boundary between the white and ochre was
different in different ships, and often passed horizontally across major
features, especially gun turrets. So that the top half of a turret might be
painted ochre and the bottom half painted white, especially in the lower aft
turrets. Gun barrels often painted black. During war time they were painted
Medium Sea Grey (870) all over (except maybe lifeboats, which can still be
painted white with brown wash on top).
- United Kingdom
- Peacetime: Black hull with white upperworks and turrets
and ochre funnels and masts. Great Britain appears to have adopted overall grey
peacetime colors very early (maybe by 1903 or so). The black hull often had a
narrow white band just below its upper edge, all the way around the ship.
Sometimes (rarely, seen once on HMS Nile) the black was carried up onto the
upperworks as high as the edge of the spar deck, making the turrets black
instead of white. Ships on tropical station would usually have white hull with
white or ochre upperworks and ochre funnels. Wartime: Dark Sea Grey (991) all
over (except maybe lifeboats, which can still be painted white with brown wash
on top).
- France
- Peacetime: Hull is black with upperworks and funnels
either silver grey (883) or ochre (913). Boundaries between hull and upperworks
colors tended to vary widely, some placed very high on the ship at spar deck
edge, and some lower at main deck edge.. Best to find photos of actual ships.
Wartime: Unknown, probably a Dark Sea Grey (991) or Medium Sea Grey (870) all
over. Some sources quote French ships having a distinctly greenish grey, which
is supported by some builder's models still in existence.
- Germany
- Peacetime: In European waters the hull can be one of
several possible schemes: Medium Sea Grey hull (870) with Silver Grey
upperworks (883), or silver grey all over. Also, Silver Grey hull with White
upperworks would be another possibility. Other variations seem to have included
white turrets (on the Brandenburgs) and dark grey turret tops on the newer
battleships. For tropical service cruisers would have their hulls white with
upperworks painted Ochre (913). Unknown how their battleships were painted for
tropical service, which would apply only to the Brandenburgs. Wartime: Unknown,
probably Silver Grey (883) all over, which is what we use. An extra note on
German battleships, aerial photos indicate that their decks were noticeable
darker, so a medium brown or tan-earth would probably be more accurate than
using the light deck tan typical on other ships.
- Italy
- Peacetime: Typically a Black hull with White or Silver
Grey (883) upperworks. The transition between black and white could be along
the edge of the main deck, or sometimes down the middle of the amidships
bulwarks/casemates. The funnels and masts were commonly painted ochre, and in
some cases - such as vessels like Italia or Andrea Doria - the lower half of
the funnels would be white and the upper half would be ochre. In vessels with
superheavy guns, the gun barrels were sometimes painted black or dark grey.
Wartime: Unknown, probably Dark Sea Grey (991) all over.
- Austria
- Peacetime: As with other European fleets, a Black hull
with White or Silver Grey (883) upperworks and funnels. Unlike the rest of the
upperworks and funnels, the ventilators, gun barrels and masts were commonly
painted black like the hull. Turret tops seemed to be dark grey. Wartime:
Reported by Jane's as being Sea Green. The best combination for this seems to
be a 1:1 mixture of Medium Sea Grey (870) and Grey Green (866), although
straight Grey Green also works while giving a greener but darker
appearance.
- China
- Peacetime: Black hull with white upperworks and ochre
funnels. Wartime: Same hull color with the white and ochre painted over with
neutral grey (992).
Cleaning and Painting Tips
WTJ Naval
miniatures should be cleaned before painting. Rapid prototype
models will be shipped to you already having been rinsed once in warm water
with liquid detergent. There may be a slight residue of mineral
oil (appears as an oily sheen in places) and possibly a few bits of support wax back in the nooks and crannies. But the
main part of what you're looking at on your new ship is the bare plastic of the
model itself.
It will be best to wash it again with warm water and liquid
detergent, using a synthetic brush to help clean the surfaces and flush out the
corners. For my own 1/1500 models I actually use a hog bristle brush, but I'm
accustomed to handling them and you might want to stick with something a bit softer.
Soaking for long periods in the detergent will not usually be necessary, normally a minute or so of brisk swishing in the water accompanied by a thorough wet brushing (brushing the model while still immersed in the warm water) should suffice.
If the liquid detergent still doesn't do the job for you, I've also used
alcohol, which is a bit stronger and only turns the very outer surface white in places (which detergent also does). In some cases you
might have to wash it a second time if you discover some overlooked spots. The important thing is to make sure the model is clean before priming and painting.
Stronger cleaning materials like Bestine solvent work well, but they are somewhat expensive. It should also be noted that in addition to being highly flammable, in some cases, heptane solvents (like Bestine) may weaken medium-sized standing features such as funnels by as much as 20%, although even at 80% strength our 1/2400 scale test pieces withstood at least 16 ounces of side loading force which is still very good (the best was HMS powerful, whose rear funnel pegged the force gage at a 36 ounce side-load without breaking!). Thorough testing has demonstrated that smaller features such as gun barrels and ventilators are not weakened by Bestine and in some cases may experience a 5% gain in resistance to shear forces. So actual effects on the model are somewhat of a tradeoff in exchange for the excellent painting surface offered by the solvent (which BTW, turns the surface of the model almost pure white). Again, the important thing is that the model be thoroughly cleaned before painting.
Once you are ready to primer
the model, select a fine, high quality spray primer. Thicker primers will blunt the details of the models. Once you are all finished painting the model, be sure to spray on a final matte sealer
in order to prevent loss of paint later-on (due to handling during games, etc.). Our best
experience has been with Krylon UV-Resistant Clear Acrylic Coating, which
routinely leave good flat seals.
Base and Mounting Tips
Most common base materials are
styrene plastic, acrylic, balsa wood and sheet metal. The easiest to work with
for smaller scales is .020" sheet styrene, which cuts easily and remains flat
during gluing and texturing. Plastic Putty can be applied with an artist's
spatula or orangewood stick to give a realistic looking sea-surface texture on
the top of the base. Paint the dried putty surface dark sea blue and seal it
with a gloss sealer. Use white paint both before or after sealing to add the
foaming water at the ship's waterline.
|
 ahead
of time should help establish what type of wire rod to use for the main pole.
For the topmasts and spars I use finer Tie Wire like that used for
floral arranging. If the only fine wire you can find is that wound in paper,
the paper can easily be stripped away.
ahead
of time should help establish what type of wire rod to use for the main pole.
For the topmasts and spars I use finer Tie Wire like that used for
floral arranging. If the only fine wire you can find is that wound in paper,
the paper can easily be stripped away.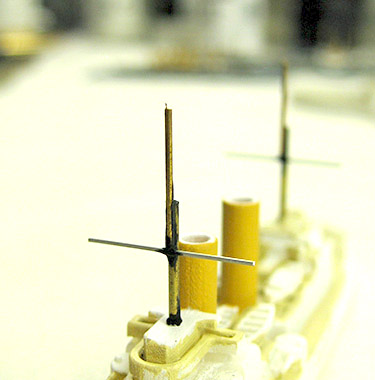 that might be necessary. As with
the main vertical masts, installing long topmasts and then trimming them to
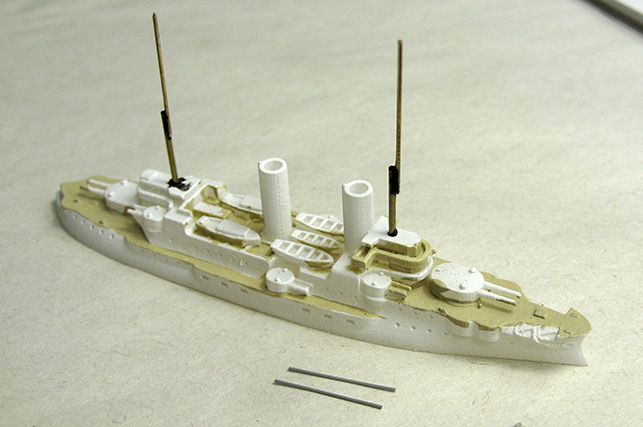
length is usually best. The image above right shows a partially painted battleship Borodino with her main vertical masts and top-masts in place.
Note that most top-masts were attached to the front of the main masts. This
model does not yet have any spars installed.
that might be necessary. As with
the main vertical masts, installing long topmasts and then trimming them to
length is usually best. The image above right shows a partially painted battleship Borodino with her main vertical masts and top-masts in place.
Note that most top-masts were attached to the front of the main masts. This
model does not yet have any spars installed.