| |

ADMIRALTY
FIGHTING SAIL WARFARE: 1750 - 1815
|
Admiralty Combat Chart
Guide
Introduction
This guide will help to quickly understand how the
various tables on the Admiralty combat chart work. The different tables are used to resolve gunnery effects, movement, sail settings and offer references for game play. The tables
themselves are generally cross reference style, designed to save game time by
compounding several actions together into one sequence where possible. The combat chart shown is the standard medium scale for 1/1200 ranges, but the guidance applies to all scales. Last updated December 31, 2025. |
 Cannon Fire Cannon Fire
These two tables are used to resolve
cannon fire between ships.
The Gun Dice table is used to score hits, the Hit Table is used to resolve damage from hits scored.
Gun Dice
Start by measuring on-board to find the range that the ship's cannon are firing at, then refer to the Range line (number 1) to find the available range columns for Close, Medium or Long ranges. Once you know the range being used, cross index the range with the Crew Grade (number 2) to find which die roll range to select from the results field (number 3). The cross index flow is approximately shown
by the blue arrows, which for this example point to a cross index of medium range and crew grade B. Each of the ship's Gun Dice score a hit when their result is equal to or greater than the number shown. For example, the blue example arrows are pointing at a roll number that scores hits on any gun die rolls of 5 or 6.
Remember that before rolling the gun dice, players must declare which dice are targeting hull and which are targeting rigging, any one die may not target both. This is done by pulling dice of two different colors; black for hull and white for rigging (actual dice used can be any two colors) as a mix, with both colors present in each die roll round. See the rules for target selection and die mixes.
Below the table are dice quantity modifiers. These change the number of gun dice that the ship can roll by increasing or decreasing them according to conditions using standard rounding. For example; a ship firing nine heavy guns at medium range would roll five dice, not nine dice. Based on the blue example arrows above, the five dice would score hits on any rolls of 5 or 6.
Hit Table
If the Gun Dice roll causes hits, refer to the Hit Table. Begin at the Start Line (number 4) and cross index it with the Target type (number 5) for Hull and/or Rigging to get the standard Medium result for each (number 6); the base Start Line hull hit is 2G (two Gun Hits) and the base Start Line rigging hit is 3S (three Sail Hits). The Line Modifiers will move the start line up or down; for example, dice rolled for heavy cannon receive a plus one (+1), which raises their hit results to 3G for Hull targets or 4S and 1M for Rigging targets.
Note that each extra 6 rolled on the gun dice score a Critical Hit for that target type (CRH for hull, CRR for rigging).
Cannon Fire Example #1: A
ship's medium battery of 9 guns is firing at long range, the crew is Grade B. The number of dice is reduced to two (25% of nine using standard rounding) and the player rolls one black and one white die. The two dice results are 3 for black and 6 for white, so one Rigging Hit is scored using the Start Line damage of three sail hits (3S).
Cannon Fire Example #2: A ship's heavy battery of 8 guns is firing at close range with a bow rake, the crew is Grade C. The number of dice is increased to 12 due to the bow rake and the dice are rolled with hits being scored on roll results of 4, 5 or 6. The player rolls 9 black dice and 3 white dice, which score six Hull Hit and one Rigging hit. The six hull hits score 18 Gun Hits (Start line plus one level for Heavy Fire goes to 3G) that will result in three gun dice lost plus three extra gun hit points recorded in the ship log. The one Rigging Hit will also be raised one level due to Heavy Fire, which scores four sail hits (4S) plus a Mast Hit. Roll 1D6 on the Critical Hit table for extra S hits caused by the mast hit. |
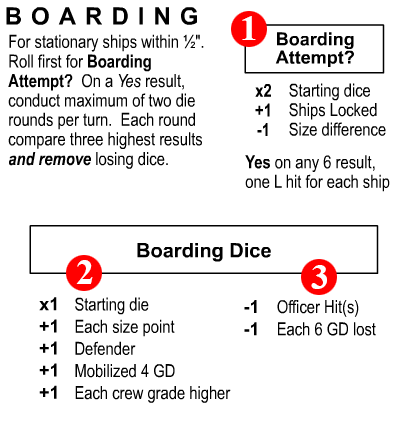 Boarding Boarding
This table is used to decide whether a boarding attempt happens and to resolve the combat if it does happen. Note that ships must be in close proximity to consider boarding and that the ships must be stationary.
The first step is to use the Boarding Attempt? table (number 1)
to find out if a boarding attempt has been able to happen. Start with two dice, and add one more if the ships are fouled (locked together) and subtract one die if the ships are of different sizes. Roll the dice, and if there are any 6 results, a boarding action happens and players proceed to the Boarding Dice section.
Setup for the boarding dice roll-off by having each side (each player) refer to the plus column under Boarding Dice (number 2). Each player starts with one die, and then modifies the number of dice by adding them per the rest of that column (+1 for each ship size point, etc.). Then refer to the minus column (number 3) to see if any dice accumulated so far should be removed. Once each side has their boarding dice, both sides simultaneously roll, compare their three highest die roll results and remove the losing dice (the lowest of each of the three comparison pairs). This is done for a maximum of two die rolling rounds per turn, meaning that if neither side loses all of their dice or surrenders, the boarding action competition will resume on the next turn. See the Boarding Action section of the rules for more details. |
 Surrender Surrender
Once a ship has lost all of its gun dice and sails, it is defenseless and motionless and will surrender if enemy vessels approach the vessel at the same time that friendly ships are not within support range. This table lays out the conditions for if and when this happens.
For each surrender candidate (ship with no speed or guns), refer to the Crew Grade column (number 1) and cross reference it against the Friend/Enemy Proximity line
(number 2). The results will show the required distance that friendly ships need to be to prevent surrender (number
3) and the approach distance within which enemy ships will force a decision (number 4). In order for a surrender to happen, both conditions must be satisfied: There can be no friendly ships within the Friend range shown, and there must be at least one enemy ship within the Enemy range shown.
.
|
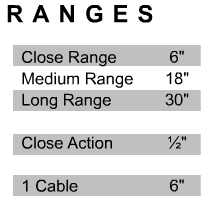 Ranges Ranges
This table shows the three available ranges for cannon fire inches, as well as a range for close action (for collision and boarding checks) as well as a reference distance for what one cable distance is on the board. One cable is one-tenth of a nautical mile, or about 200 yards (202.5 yards actually). |
 Critical Hits Critical Hits
Critical hits are the various types of random damage that happen in addition to the constant stream of gun and sail damage. Whenever a critical hit (or more than one) is called for, refer to the Hit Type column (number
1), and find the matching hit type to be resolved. Cross index the corresponding line with the die roll result at the top (number 2) as
indicated by the two blue reference arrows. The results in the hit code field
(number 3) indicate the type of damage to be applied - if any. Resolve all results and follow-up rolls immediately. Note that many die rolls have no result, as shown by a dash mark. See the Hit Key table on the combat chart for brief descriptions of the critical hit codes.
Gun Modifiers: The +1 and -1 modifiers for heavy and light guns from the gun hit table also apply to critical hit die rolls.
Waterline Hit effects: The reference paragraph at the bottom describes the progressive effects of W Hits on the ship. |
 Turn Sequence Turn Sequence
The
Turn Sequence box shows a simple outline of the order in which the battlefield
commanders (players) issue orders, move their units and resolve combat. See
the Admiralty rules section 1.4 Turn Sequence for more detailed information. |
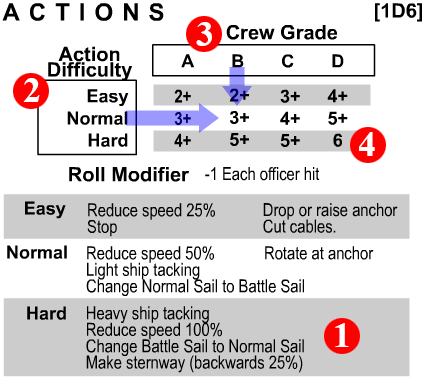 Actions Actions
The Actions table is used to control the speed and ease with which different crew grades can execute certain difficult (or not so difficult) functions. Most of these actions will be related to changes in the ship's sails or anchors. A ship attempting these actions must pass a die roll test in order to execute them.
Start by locating the Easy, Normal or Hard action to be carried out from the list that makes up the bottom half of the table (number 1). Expected actions that all crews are presumed able to do such as wearing are not listed and do not need die rolls to be carried out. Once the player has identified the action and its difficulty level, go to the Action Difficulty column (number 2) and cross reference that line with the corresponding Crew Grade (number 3) that matches the crew grade of the ship. The cross reference point in the result field (number 4) will be the number on 1D6 that the has to roll equal to or higher in order to carry out that action. Subtract one point from the die roll for each Officer Hit the ship has suffered.
. |
 Collisions
This table is used
to establish whether a collision has happened between two ships approaching extremely close to each other. This can happen even if only one of the ships is moving. Both ships must roll on the table for collision checks, so it is possible for only one to be locked to the other, or for both ships to be locked together.
Collision Courses
To start a collision check, refer to the Collision Courses examples on the right side of the table (number 1). These will help establish whether the combined courses are Collision or Other. Each black pointer represents a ship, thereby showing whether the vessels in question are sailing on parallel or perpendicular courses and whether those courses are fundamentally converging (collision) or some other non-converging type such as running in-line, abreast or crossing a ship's stern.
Use that information and refer to the Combined Courses header (number 2), which is split into two sections; Collision Course (number 3) and Other Course (number 4), which correspond to the course examples at right. Each of the course types contains three categories for the part of the ship most affected by the collision event, these are: bow, side and stern. After establishing the part of each affected ship, roll 1D6 and cross reference the number rolled from the Die Roll column (number 5) with the combined course type (see blue guide arrows) to find the types of hit suffered by the ship in question. There are two die roll modifiers for Trying to lock and Other ship is enemy. Those should be added to both ship's die rolls as applicable.
Example: One ship is stopped and another enemy ship approaches from aft (behind) and comes extremely close alongside the other. The ship that just moved is trying to lock onto the stopped vessel. Both will roll on the Other Course/side column, with both getting a +2 on the die roll for the other ship being an enemy, and the ship which is trying to lock gets an additional +2 for actually trying to foul with the enemy ship. The stopped ship rolls a 5, which modifies to a 7. It suffers 4G Hits, a Mast Hit and is Locked to the enemy ship that just came alongside. The ship that just moved rolls a 2, which modifies to a 6; it suffers 2G Hits and also becomes locked with the stopped enemy ship. Both vessels are now locked and halted, with no further movement possible for either vessel.
|
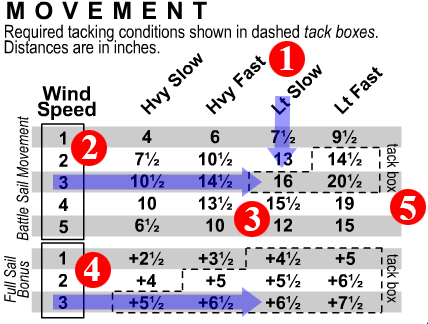 Movement Movement
This table acts as a backup to the movement numbers listed in the ship log, mostly in case of wind change or other need to look up available ship's speed. Plus, the information is good to have quickly available while filling out the ship logs.
Start by locating the ship speed (number 1). The speed of any one ship type (or something like it) will be listed in the Ship Values pages listed by nationality on the Admiralty home page. Cross reference the ship speed rating (number 1) with the current game Wind Speed for the Battle Sail setting (number 2) and cross reference them to get the ship's speed (number 3). Note that the equivalent number for the Full Sail setting (number 4) is a movement bonus, not a standalone movement rate. All movements are in inches.
Around each movement and bonus table are dashed Tack Boxes (number 5) that show the speeds (and speed bonuses) that allow ships to do tacking actions (changing direction by turning through the wind). Only ships moving at those rates or using those bonuses may roll for and attempt to conduct tacking maneuvers. If a ship's available speed drops to levels equal to or less than the next speed bracket down for that wind speed - usually due to damage - then the ship may no longer attempt tacking turns.
. |
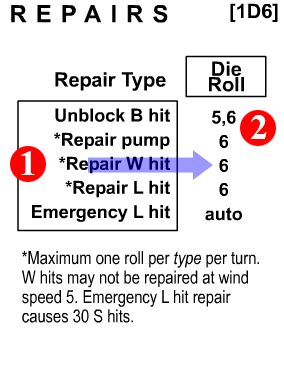 Repairs Repairs
Ships may attempt to conduct a few simple repair types.
Start by locating the type of repair to be attempted (number 1). Roll 1D6 and consult the number listed under Die Roll that corresponds to the repair type (number 2). In order for that critical hit to be repaired the die roll must match the numbers listed . Repaired hits are crossed-out of the ship log.
. |
Combat Chart Info
Strip
Somewhere on each combat chart sheet will be a copyright
notice, a note of which revision of Admiralty the sheet applies to, the
revision date for the particular sheet and a subtitle showing that it is an
Admiralty chart and which general scale it is set for. The revision date,
which will appear as a string of numbers, is valuable for finding out if a
combat chart you have printed at home is the latest version. Admiralty
revision dates use the six digit Month-Day-Year dating scheme. |
|
|
