|
« 1.1 Game
Scales
Admiralty was designed for use with any scale of fighting sail
miniatures. The medium scale format shown in Figure 1 is the default scale
discussed throughout the rules, and is normally used with 1/1200 scale
miniatures. The small scale format is normally used with 1/2400 scale ships, the tiny scale format is meant primarily for the 1/4800 scale models and the large scale is used most commonly with 1/700 scale models. Each turn's movement represents about two to three minutes of real time.
| FIG. 1. - GAME SCALES |
| Feature |
Tiny |
Small |
Medium |
Large |
| 100 Yards |
¾" |
1½" |
3" |
5" |
| 1 Cable (1/10th naut. mile) |
1½" |
3" |
6" |
10" |
| 1 Nautical Mile |
15" |
30" |
60" |
100" |
| Each Turn |
2 Minutes |
2 Minutes |
2 Minutes |
2 Minutes |
| Each model |
1 Ship |
1 Ship |
1 Ship |
1 Ship |
| Model Scale |
1/4800 |
1/2400 |
1/1200 |
1/700 |
| Board Scaling Ratio |
0.25 |
0.5 |
0 |
1.66 |
|
« 1.2 Ship
Bases
The mounting of naval miniatures on bases for game play is
optional, although most players do use them. We usually mount them on thin metal bass and apply a textured coating for sea-surface effects, with the ship's name written or labeled on the bottom. For purposes of
game play and rules discussion, the terms model, ship and
base are used interchangeably throughout the text. In all cases the
reference is a general one meant to encompass whatever model and mounting
format being used by the players. Every base (or ship model) is considered to
have a single imaginary center-point which will be occasionally referred to.
Some of the reference templates are meant to be placed at specific locations,
either against the side of the model or at the edge of its base. The game chart
instruction sheet will outline which is required for a given
template.
Rake Zones - A feature which is not physically marked
on the base is the rake zone. The rake zone is an invisible boundary
area off the front and rear of a ship which defines when an enemy vessels
receives a rake bonus for cannon fire. Ships should avoid
letting enemy vessels get within their rake zone. The rake zone runs diagonally
across the corners of a ship's base, forming a roughly 55°
arc. This presumes use of a base that approximately matches the length and width of the ship with some room to spare around the edges, and that all models used in the game have roughly the same model-to-base size ratio.
Measuring Distances - When measuring distances for
movement, players will always measure from the front edge of a ship's base, or
from the front edge of the model. When measuring to check cannon fire
range, players measure from the main mast of their ship model to the main mast
of the targeted enemy ship.
« 1.3
Equipment
Naval wargaming is more technically demanding than some
other forms of miniature wargaming, and a few extra tools are used for game
play. The standard gaming equipment of tape measures, six-sided dice and pens/pencils will be needed. Beginning players should remember
that two dice are called "dice" but that one is only called a "die." Players
will also need to download both sides of the Admiralty combat chart as well as
the ship log and move templates. Cutting out the templates and mounting them on
thin cardboard will give them extra strength. A clipboard is also valuable for
writing on the ship logs.
Combat Charts - There is a front and back side to
the combat chart (Side 1 and Side 2). Both sides are needed for game play, so players should make
sure to print out both of them.
Move Templates - To help players understand turning
capabilities, movement in relation to wind direction and the firing arc of their
ship, we have included a sheet of game templates. A link to the template page
itself is located on the main Admiralty home page and the template sheet
includes detailed instructions for use.
Ship Logs: Each vessel used in combat will need to
have an entry in one of the ship logs. These entries are used to track events
on board each of the ships. The information shown in the Ship Values listings
on the Admiralty home page should cover everything needed to fill out the ship
logs for those vessels.
« 1.4 Turn
Sequence
Once all players have gone through the set-up page, placed
their ships and arranged their formations, game play is ready to begin. Each
turn is split into phases, and some phases are split into steps. Below is an
outline of the turn sequence and its basic steps. If the step has no matching actions that turn, ignore it and move on to the next step or phase.
- Movement
- a) Roll for fire danger – Roll a fire danger (D)
check for any ship which is currently Locked (L) with any vessels that have
active Infernos burning on board (roll once for each inferno).
- b) Movement (DMF) – Players move
ships for both sides, starting first with the ship that is furthest downwind (in the lee position). This is the Downwind Moves First method. In most cases this
will be fairly obvious. In closer cases, a quick measurement to establish next furthest
downwind can be done..
- Command 1
- a) Mobilize Boarding Parties – Both players
declare and record all boarding dice additions and the resulting gun dice
losses.
- b) Send signals – Both players may attempt to send
maneuver signals and basic instructions to other players.
- Firing
- a) Roll for active I hits – The first step in each
firing phase is to roll on the critical hit table for all active Infernos.
Commanding players roll for their own ships and immediately apply all results
before proceeding.
- b) Roll for active F hits – Roll on the critical
hit table for all active Fires. Commanding players roll for their own ships and
immediately apply all results before proceeding.
- c) Conduct cannon fire – All cannon fire is
considered simultaneous. Players may fire any of their ships which can bear on
targets. See Section 4 : Firing for more about
conducting cannon fire.
- d) Roll for fire danger – Roll Fire Danger checks
for any ships which fired their guns while either: A) Unrepaired B hits existed on the
same side of the ship, or B) Sail speed was set to normal (full) sail. All results are
immediately added to the respective vessel's critical hit boxes.
- Command 2
- a) Change Sail Setting – Both players may attempt to
change the sail settings for their ships.
b) Check for Surrender –
Ships which are immobilized and without guns must check proximity of friendly
and enemy vessels to see if they surrender.
- Boarding
- a) Roll for Boarding Attempts – Either side wanting to initiate a boarding attempt declares it and rolls to see if the attempt happens.
b) Roll for Boarding Actions –
Resolve all boarding actions.
- Repair
« 1.5
Glossary
The rules text has been kept as plain as possible for those
unfamiliar with naval terminology. Some words are in such broad usage however,
that they are inevitably used. Below is a short list of definitions for those
that would likely show up.
Bow – The front end of a ship
Broadside
– When all the guns on one side of a ship fire at the same time.
Hull
– The main body of a ship, built out of heavy wooden timbers.
Lee
– Downwind. The lee side of a ship is that which is downwind, and a fleet
in a lee position is downwind from their enemy.
Port – The left
side of a ship
Rake – Firing down the length of a ship from a position
off of its bow or stern.
Rigging – The part of a ship which supports
and operates the sails, and also holds the masts in place.
Starboard – The right side of a ship
Stern
– The back end of a ship
Weather – Upwind, opposite of lee. The
weather side of a ship is that which is facing into the wind. A fleet in a
weather position is upwind from their enemy.
« 2.0
Movement
Ship models are moved on flat, open surfaces without use of
grids. All movement is conducted in inches and available speed is
controlled by several factors including ship type, wind speed, movement direction and sail
setting. According to these factors, each ship is allotted a specific
movement allowance for the turn. Commanding players may move their ships in any
direction of their choosing, including those directions which are not
advisable. The rules do not prevent players from making mistakes, and so a bit
of practice may be needed in order to help players make the best movement
decisions. Players should keep in mind that naval battles of this time were
decided in part by the side which made the least number of maneuver errors.
Order of Movement – Ships are moved starting with the vessel that is furthest downwind on the entire board (DMF = Downwind Moves First) and then moved in upward progression of ships further upwind. This is conducted regardless of ship speed or nationality. The last ship to move should be that which was furthest upwind (on the entire board) as of the start of that phase. If two ships are on close, converging courses and very near to each other for weather position (upwind vs downwind) players may prorate their movements using the best available method (i.e., alternating one-quarter moves or whatever speed increment works best for the situation). Two ships of the same side that are moving in-line within a half-cable of each other may move in unison (i.e., as if in formation), permitting either one to move first if either is next to move in DMF sequence. This permits ships of the same side to coordinate for purposes of collision avoidance, etc.
« 2.1 Moving
Straight
The first step in moving a ship is to confirm it is not
pointed too far into the wind. This can usually be achieved with a quick visual
check, but vessel's which look like they are too close to the wind (i.e., pointing too far toward the wind's direction) should be checked using the wind
gage template. The template will confirm according to crew grade whether a
vessel has wind in its sails and can therefore use its sail settings for
regular movement. If a ship does not qualify for regular movement because it is
aiming too far into the wind and it is not in the middle of tacking (turning
through the wind) refer to the In Irons special rule below.
To
move a ship, refer to its log and confirm its current Sail Setting and available Sail Speed.
The current sail setting is a
general description such as Battle, Normal or Stop and describes the state of the ship's sail arrangement. Obviously in the case of a
"Stop" or "Anchored" sail setting, a vessel will not move and there is no need
to calculate available movement for the turn. Next, look at the Sail Speed box to see what the ship's current available Battle move is. "Battle" refers to a ship with its sails set for combat. The ship's battle sail movement allowance will have been recorded in the ship's log before game play (see the Admiralty Setup page. The ship's Normal (full) sail movement bonus will also have been recorded before the game starts. This saves players the time of looking it up mid-game, but the numbers are also available in the Movement table on the combat chart.
Normal Sail Bonus – The number recorded under Normal Bonus on the ship log is the distance in inches that can be added to the ship's battle movement if the ship's Sail Setting is Normal instead of Battle. Add this number to whatever the current available battle speed is. Note that beyond a certain point, reductions to the battle speed due to hit starts to affect normal speed also. See the Damage Hits section below.
Once the final movement allowance for a ship is
confirmed, it must be moved that distance in inches. It may not move more
or less than that amount unless the moving player wishes to slow the vessel
down by rolling for speed reductions on the Actions table (see Move
Actions below). If a vessel or obstacle is in the path of the moving ship
and it cannot slow down, it must attempt to turn to prevent a collision.
Tacking
Tacking has advantages over wearing, mainly
because it takes less time to resume movement on the new heading. However, if a
ship makes a mistake while tacking, it can end up stuck with its bow pointing
into the wind – a very bad way to be when there are enemy ships loitering
in the area. So a ship never turns upwind and stays that way on purpose. Its
goal is to get up some speed and then turn as quickly as possible so that it
ends its turn with the wind on the other side of the ship. |
« 2.2
Turning
There are two basic ways to turn a ship; turn downwind or
turn upwind. Turning downwind is called wearing and is the easiest way
to turn. Turning upwind is called tacking and it is the most difficult
way to turn. In order to turn a ship in Admiralty, you will use the Turn
Gage that is included on the templates sheet. The turn gage restricts how
tightly a vessel can turn while also showing the rate at which its movement is
consumed during the turning maneuver.
Players may not pre-measure,
re-measure or otherwise "take back" any turning maneuvers they conduct or even
begin to conduct with their ships. Once a turn gage is laid down and a player
begins moving his ship, he must complete the maneuver. If a player begins
making a turn and realizes that the ship's alignment is not correct in relation
to other ships ahead or behind (usually because of starting the turn too early
or too late) nothing can be done about it at that point. The imperfect move
must be completed and any resulting errors in alignment resolved on later
movement turns. Note that turning a ship will change its orientation to the
wind, which must be carefully watched. A ship may not change its sail setting
whilst it is turning.
Turning Downwind - For wearing (turning
downwind) place the Turning Gage with the zero pointer alongside the center
edge of the ship's stand and move the stand to the same pointer position on the
2" line which corresponds to the ship's current speed in inches. The
ship will use 2" of its available movement in order to make this one turn.
Ships can make any number of these turns in a movement step so long as they do
not exceed their available movement limit. Note that all wearing "speed lines"
are marked as a W1, W2 or W3, and that these can also be used to move slightly upwind, so long it is short of attempting to tack (see below).
Tacking - For tacking (changing course to put wind on the other side of the ship by turning sharply into the wind), place
the turn gage with the zero pointer alongside the center edge of the ship's
stand and move the stand to the same pointer position on the 2" "T" line. The
ship will use 2" of its available movement in order to make this one turn.
The ship can make any number of these turns in a movement step so long as they
do not exceed their available movement limit.
At the precise point
during a turn upwind that a ship's bow is pointed directly into the wind, the
moving player must pass a die roll test on the Move Actions table. Depending on
wind speed (and corresponding sea conditions) the maneuver may be considered
moderate or hard on the difficulty scale. If the player passes the test, the
ship may continue with its tacking maneuver (ships may use consecutive move
turns in order to tack completely). If the ship does not pass the test, it is
considered In Irons. Refer to the special rules section for ships in
irons.
Vessels size 1/2 and smaller will tack by rotating in place
instead of using the turn gage. Ships making sternway may also use the Tacking
turn line.
Sail Settings
The sail
setting in the game broadly corresponds to sail setting used in real life.
Battle sail is for ships with topsails and gallants set. Normal sail
corresponds to ships with all of their normal square sails set to varying
degrees - basically whatever is necessary to make best speed in the current
wind conditions. Ships under normal sail are more subject to rigging damage
because of the stress imposed by the increased loads and wind pressure. Masts
under normal sail are enduring a tremendous amount of stress and can fail if
even slightly damaged. Realistically however, the main reason for making battle
sail was to release as much of the crew as possible for servicing the guns and
to offer the best combination of maneuverability and stability in a
seaway. |
« 2.3 Move Actions
During
the course of moving, a player may wish for their ship to maneuver or act in a
way that depends on crew skill. A vessel attempting one of these Actions must pass a die roll test based on the difficulty of the action and
the grade of the crew. Move actions can be as simple as anchoring the ship, or
as complicated as making sternway (moving the ship backwards under
sail). Types of movement not listed on the Actions table do not require a die roll to execute (moving straight forward, turning downwind, etc.).
To attempt a move action, cross index the action's difficulty
level with the moving vessel's crew grade and roll one six sided die. The die
result must be equal to or higher than the number indexed for that crew and
difficulty level. The die roll receives a minus one (-1) modifier for each Officer Hit the ship has suffered. Failure of the test means that the attempted action may not
be executed. The ship's current movement allowance remains unchanged but it may
not attempt any further move actions until next turn. A vessel may attempt and
execute only one move action during any one movement step. Below is a list of
available move actions and their effect:
Stop – Stopping the
ship is considered an easy operation. It means that the sail setting has been
reduced to such a level that the vessel is no longer making headway and may not
turn except by rotating at anchor. A vessel which changes its speed setting to
stop when it was under normal sail on the previous turn, will continue to move
half of its normal sail movement rate before it is considered completely
stopped (due to momentum that carries the ship forward even after the sails are
brought in).
Adjust Speed - A vessel wishing
to fine-tune its movement while under sail may attempt to do so with a speed
adjustment, which always takes the form of a controlled reduction in sail speed without actually changing the ship's sail speed value on the ship log. Greater speed reductions require better crews and/or more time (i.e., more turns spent in the attempt). Speed reductions up to 25% are considered
easy. Speed reductions up to 50% are of moderate difficulty and speed
reductions up to 100% are considered hard. Successful speed reduction actions
should be marked with a marker next to the model, or on the ship's log as the reduction percentage the
player wants to use - within the limits of the value successfully rolled. A
player does not have to use the maximum amount rolled for. If for example, he
successfully rolls for a speed reduction up to 50%, he may execute any reduction
between 1% and 50%, although once recorded, the selected reduction setting may
not be changed to another value without rolling another move action test. And
of course most people will not attempt a more difficult reduction unless they
plan to use a substantial portion of it.
Once achieved, a specific speed
reduction may be used on consecutive turns so long as the reduction
amount is not changed or abandoned (i.e., once achieved, a player does not
need to roll every turn for that ship to re-establish the same speed reduction).
If however, the ship changes sail setting or even attempts to employ a
different reduction value, the previous reduction status is lost. No die roll
is necessary in order to abandon a previously attained speed reduction, the
player simply announces at any point during movement that the existing
reduction is being abandoned.
If in the process of rolling for a 50% or
100% speed reduction, a player incidentally rolls a result that would pass the
test for a lesser speed reduction, the player may accept and use that lesser
speed reduction for the vessel in question. A speed reduction roll only applies
to the vessel being rolled for and none others.
Anchoring –
A vessel may drop anchor, raise anchor or cut its cables (sever the lines going
down to a dropped anchor). To do so it must be currently stopped and must pass
an Easy test rating. Each of the anchoring actions takes place as follows:
Anchoring — A vessel intending
to drop anchor must be completely stopped. If it passes the move action test
for anchoring, it may mark Anchored in the sail settings box on the ship log.
Anchored ships may not move and gain a bonus modifier on the Gun Dice table.
Anchored ships are also immune to any drifting effects caused by currents or
wind.
Raising Anchor — A vessel which is currently
anchored may raise anchor, which will allow it to change sail setting to Normal
or Battle and begin moving. If it passes the move action test for raising
anchor, the ship must wait 15 turns before the anchor is considered fully
raised, at which point the player may change the sail setting box status from
Anchored to Stopped. Ships raising anchor may not mobilize gun crews and a
vessel's active anchor raising action is immediately canceled if it receives
any anchor hits or becomes locked with any other ship. It is not common for a
ship to raise anchor in the normal fashion under combat conditions, they will
instead usually cut their cables and rely on spare anchors
later.
Cutting Cables — A vessel which is currently
anchored may cut the cables which connect the ship to the lowered anchor down
on the sea floor. This is an extreme measure, because both the anchor and the
cable itself (which can be many hundreds of feet long) are extremely expensive
and hard to replace items. Still, under some combat conditions ships may not
have time to raise anchor the normal way and will instead "Cut their cables"
and get moving.
If a ship passes the move action test for cutting
cables, it may change the sail setting box status from Anchored to Stopped.
This allows the commanding player to attempt a change of sail setting to Normal
or Battle on the following Change Speed step.
Rotate at
Anchor – A vessel which is currently anchored may actually rotate in
position by rigging cable "springs" to the existing anchoring system. This is
usually done if an enemy ship is nearby and the anchored ship needs to keep its
broadside guns facing their target. If a ship passes the move action test to
rotate at anchor, it may rotate on its center-point up to 45° for that move
step. Players may also use the "T" line on the turning gage as a reference
angle for maximum rotation. Rotating at anchor is not an open ended action like
speed reduction, attempts made on consecutive turns must be rolled for
independently.
Turning upwind (tacking) – A ship
attempting to tack must roll a move action test at the moment it is pointed
directly into the wind. If it passes the test, it may continue with its sharp
tacking turns until it is on its new course with wind in its sail. If it fails
the test, it is considered to have "Missed Stays" and will be stuck facing into
the wind. Ships that miss stays must immediately stop their tacking move and
may not attempt any further movement until the next movement phase. At that
point the stationary ship must follow the In Irons special rule
below. Note that vessels may not attempt tacking at wind speeds 1 or 5, tacking may only be attempted at wind speeds 2 through 4.
Change Sail Setting – The ability of a crew to make
major changes in sail settings in Admiralty is directly affected by the combat
conditions surrounding the ship. Even a D rated crew might perform
reasonably well in calm, peacetime waters, but will not behave that way in the
presence of the enemy. Hence the difficulties in changing major speed setting
during the game.
For game play, a ship attempting to change from Normal
Sail setting to Battle Sail setting is considered to be making a moderately
difficult move action. Changing the other way: from Battle Sail to Normal Sail
is more difficult under combat conditions and is considered a hard move action.
If a vessel passes the action test die roll to change between either speed
setting, simply change the entry in the Sail Settings box on that ship's log.
If the move action roll fails, the ship retains its previous sail setting for
the turn. The player may attempt to change settings next turn, and there are no
limits on the number of consecutive turns that a player may attempt to change
sail settings.
Make Sternway – This is one of the more
difficult move actions and should only be attempted by an experienced crew.
Players which successfully pass the move action test for making sternway may
move the ship backwards up to 20% of their normal sail move rating for the
current wind speed, up to a limit of 1½" movement (no ship may make sternway
faster than this). This includes ships under battle sail,
so a ship under battle sail making sternway may move backwards at 20% of their
normal sail rate, not 20% of their battle sail rate. Ships making sternway must
have wind in their sails, they may not be in irons or otherwise facing into the
wind, and they may not have the wind blowing from within their stern rake zone
(I.E. - from directly behind the ship). A vessel making sternway may use up to
one "T" turning gage step (or "W" turn lines if they wish) per movement phase.
A vessel which attempts to make sternway and fails the move action test is
considered stopped, which should be marked in the ship's Sail Setting
log.
Players do not need to mark the sternway movement condition in the
Sail Setting log unless they intend to move that way for more than one turn.
Sternway is an open ended move action like speed reduction, once achieved the
moving ship may continue moving that way on consecutive turns without having to
roll further move actions tests for it. The same rules of abandonment and
change that apply to speed reduction also applies to making sternway. Not that
in the advanced rules below, poor grade crews may damage the ship if they
attempt to make sternway.
« 2.4
Collisions
If a ship moves within one-half inch of another vessel during its
movement, both must roll on the Collision table to check for hits and damage.
Begin by establishing whether the combined courses of the two ships are Collision or Other, and at what point the affected areas of the
ships are most in danger of colliding. Each player then rolls one six sided die
and modifies the roll result with all applicable modifiers. Cross index the
modified number with the portion of the ship most affected – bow, side or
stern – and apply the results shown.
The collision check should
always be made at: (a) The point during the active ship's entire
movement that it comes closest to the other vessel, or (b) The point
during the active ship's movement that both vessels are at maximum
engagement. In either case, the collision check will often not occur at the
moment the ships approach within one-half inch, but the moment at which they are most in
danger of collision and fouling for the entire course of that move. This last
item is an important one, as many vessels should be allowed to "come alongside"
other ships before checking for collisions – if such a maneuver is their
intent – rather than checking for collision and locking at the very first
moment they approach within one-half inch.

Combined Courses – There
are two basic categories of courses: collision and other. A collision course is
one in which the ships are clearly converging and in danger of striking each other or becoming
locked due to fouling. Other courses are usually when ships are traveling
parallel to each other or passing one another. The combat chart includes a
basic outline of Collision Course figures showing the general intent of the two
main categories.
Affected Areas – Deciding the affected
portion of a ship will usually be easy. If two vessels have come alongside each
other, then each will use the side column. If a vessel is being passed astern,
it will use the stern column while the ship passing it will use the side
column. If a vessel is headed straight for the side of another ship, it will
use the bow column while the other vessel uses the side column.
As
noted above, players should keep in mind the portions of the ship most at risk
at the mostly like point of collision. For example, if two ships are passing
each other in opposite directions (collision course) and their sides are
parallel to each other, they would check for collision when they are fully
abreast of each other (the point of maximum engagement) not at the moment their
bows come within range. If ships in close proxmity do not suffer L Hits (locked), they will continue with normal movement. If due to movement limits they remain in close proximity until the following turn, they do not need to roll for collision a second time unless either vessel changes course in a way that increases the collision risk. In such a case, a new collision check should be done.
« 2.6 Special
Rules
In Irons – A ship facing into the wind while under
sail is considered to be "In Irons" and is currently out of control. This can
be caused if a ship attempted to tack and "missed stays" or it can be caused if
a vessel unwisely sailed too close to the wind and ended up losing wind power.
A ship in irons must drift in the direction of the wind 10% of its current
available movement for whatever sail setting is currently active. The ship may
not turn or change heading (the direction the bow points). If the ship is under
normal sail and the wind is within the ship's bow rake arc, it must roll one
six sided die on the first turn it is blown backwards, suffering a Mast hit on
a roll result of 6. The resulting M hit roll on the critical hit table must
apply all rigging damage but will ignore any XX repair results.
A ship
may escape from this condition by successfully rolling a test as a Hard move
action. If successful, the ship may use one "T" turning gage
step, which should be used to move in a direction most likely to get wind back
in its sails again as quickly as possible (usually going backwards). Each
passed test only allows a single move step for that turn, so escaping from
irons may take numerous turns as the ship slowly inches its way out of the
difficult situation. Ships which turn while moving backwards out of being in
irons must check for possible rudder damage in the same way as vessels making
sternway.
Emergency Battle Sail – Ships under normal sail
which suffer more than 25% sail hits may declare an emergency change to battle
sail setting during the Change Speed step. Making this change should be marked
in the Sail Setting log, as a ship which makes such a change may not use the
normal sail setting again during the course of the game. No move action test is
necessary to conduct an emergency battle sail change.
« 3.0
Command
During the two command phases, players can
execute a range of standing orders and settings. There are two command phases; the first one resolves boarding party mobilization and signaling, the second one handles changing sail settings and surrendering ships. As with the rest of the rules, each step is described here in the order encountered in the turn sequence.
« 3.1 Mobilize
Boarding Parties
A player may add to the number of boarding dice
which can be used in the later Boarding phase by temporarily deactivating gun
dice. One boarding die is gained for each four gun dice that are deactivated.
Do not cross out mobilized gun dice values. Instead, mark an GM at the bottom
center of the Gun Dice box, followed by the number of gun dice deactivated. The
GM entry applies to both sides of the ship, so for example a vessel with a 505
gun dice rating can only mobilize a total of two additional boarding dice, not
two dice for each side of the ship.
Because gun crews are mobilized in
groups of five gun dice, the GM values should read GM4, GM8, etc. Their
function is identical to the B hits, which temporarily suppress gun dice until
repaired. In this case, the gun dice remain suppressed while the boarding dice
are being used. If boarding dice are lost during the boarding action (due to
lost rounds) the gun dice may be permanently lost and are then crossed out,
with those contributed by the suppressed gun dice being considered last to be
lost. Note that the number of mobilized gun crews (and hence the dice they
contribute) may shrink in following turns as the ship suffers gun hits.
« 3.2
Signals
The ability to send signals and messages to other players is limited. For game play, a player posts a message on his flagship's ship
log, and other players must pass a die roll test to be allowed to read it. A
failed die roll indicates that player either did not see the message, or saw
the signal flags and could not read them.
To post a signal, a player
writes a five or ten word message on the adhesive side of a small "post it"
style message tablet. The message may not be shown to other players and must be
either one through five words long, or six through ten words long. A number
counts as a word, and run-on words and word/number combinations are not
allowed. If a commander manages to artfully avoid the obvious intent of these
rules, his fellow players should feel free to place a syllable limit on each
message. Once a message is completed, it is pasted to that signaling vessel's
ship log. Most players post it onto the back of the log page to keep it out of
the way.
To read another ship's signal, a player consults the Signals
table on the combat chart. Cross reference the message length with the line of
sight condition to establish the modified die roll needed in order to read the
message. Modify the die roll value using the die roll modifiers which are
defined below.
The player attempting to read another commander's
signaling is referred to as the reading commander. The player issuing a
signal is referred to as the signaling commander. A clear line of sight
must pass from the center-point of the reading ship to the center-point of the
signaling ship without any other ships or landmasses intervening.
Signal Roll Modifiers:
Each in
combat — A player suffers a minus one to his reading roll if
his own ship is currently in combat and an additional minus one if the
signaling ship is in combat. Combat in this case is defined as firing, being
fired upon or fouled with an enemy ship. So if the signaling ship is in combat but the reading ship is not,
the reading player will suffer a minus one. If both are in combat, the reading
ship will suffer a minus two.
Each Officer hit — Subtract one
point from the read message die roll for each O Hit that has been suffered
by either or both ship(s).
« 3.3 Changing
Sail Settings
Ships may attempt to change their current sail setting once during
the second command phase. To do so, the commanding player refers to the Actions table and rolls the appropriate die roll test for that change attempt.
If the sail setting is successfully changed, cross out the old Sail Settings "X" marked for the previous ship log setting and mark an "X" under the new setting. Below are the available sail settings and their meaning.
Stop — Used in preparation for
anchoring or to retain ability to quickly get back underway. If a vessel used
normal sail on the turn immediately preceding a stop change, the vessel in
question will continue moving half of its previous movement allowance (call
headway) on its next move. Only then will it be completely stopped.
Anchor — The ship is stopped with anchors
securing it to the sea floor. Ships with more than two Anchor Hits may not "anchor" for purposes of game play. They might still have some anchors, but not enough to completely stabilize the ship against rolling and drifting, which would be needed for combat benefits.
Battle
Sail — Standard for combat. Gives some speed while preventing
excessive stress to rigging.
Normal
(Full) Sail — Standard non-combat, full rigged movement. Fast, but vulnerable to
rigging damage in combat.
« 3.4
Surrendering
Any ship which has become immobile with all of its gun
knocked out may end up surrendering if enemy ships are too close while
friendly ships are too far away. If during the second command phase, any ship is immobilized with all guns destroyed, consult the
Surrender table on the combat chart. Start on the line matching the crew grade
of the ship and check if enemy ships are within the distance noted at far
right, in the proximity column. This distance is the Enemy Proximity. If any
enemy ships are within that distance, check to see if all friendly ships are
further away than the distance shown on the left side of the
proximity column. If no friendly ships are in the vicinity, the ship in
question will surrender.
Example: A disabled, immobilized ship with a crew
grade of C has at least one enemy ship within 1". All friendly ships are
over 2½" away, and so the disabled ship will surrender. If any friendly
ships were within 2½", the ship in question would not surrender. If friendly
ships were all more than 2½" away and all enemy ships were more than 1"
away, the ship also would not surrender. As with the rest of the Admiralty rules, these distances are for the default medium scale. Other game scales (large, small, etc.) operate at very different ranges as shown on their respective combat charts.
« 4.0 Cannon Fire
Sequence
A ship's guns are fired by declaring an enemy ship within
that vessel's arc-of-fire as a target (see 4.2 Targeting below). Cannon fire is
then conducted by rolling a number of six-sided dice based on the gun
dice numbers shown on the ship log. The gun dice numbers correspond to the
number of light, medium and heavy cannons available on each side of the vessel.
Note that within a gun dice sequence, each digit is treated individually. For
example, a gun dice value of 609 is not six-hundred and nine, it is
six, zero and nine, indicating that vessel has six light
gun dice, no medium gun dice and nine heavy gun dice available for use on each
side. In some cases the last heavy value is followed by a fourth number which
reflects the number of heavy carronade guns which may be added to the last
heavy gun value at close range. Otherwise, all cannons may be fired at all
three of the available gun ranges. A ship may only fire the cannons one side of the vessel (port or starboard) on any one turn.
Gun Dice – To fire, choose one of the gun types to roll first. Most players start with their heaviest guns and work over from there. Whatever size
is chosen, the initial number of gun dice for that size may be modified by the
Dice Quantity Modifiers in the Gun Dice table. Those modifiers change the
number of gun dice to be thrown. On the same table you will also check for the
hit roll values, which are the numbers that actually have to be rolled on each
gun die for a hit to occur. A certain
portion of the dice to be rolled will attack the target ship's hull, and the
remainder will attack the target ship's rigging. See Targeting below for more
information about the numbers of dice that can/should be used for each of the two
target types.
Once the dice quantity and mix are set, roll them all simultaneously (die towers help for this). Any dice results equal to or greater than the hit roll values shown for that crew/range combination are considered hits. Go to the Hit Table to see what damage is done.
Hit Table – Next, begin at the Start Line on the Hit
Table and modify it up or down according to the Line Modifiers – if any
apply. The maximum cannon fire line is +2 and the minimum is -2. Remember that hull targeted
dice only inflict damage hits shown in the Hull Target column and rigging
targeted dice only inflict damage shown in the Rigging Target column. Record
the resulting hits – if any – on the ship log and proceed to the next
gun size.
General Cannon Fire Rules – Different ships
firing onto the same target with identical modifiers may group their dice into
one roll. Each group of guns or "battery" may only fire once each
turn. All fire conducted during a turn is considered to be
simultaneous. Damage inflicted during the course of the Cannon Fire step only
becomes effective at the end of the step when all ships have had their
opportunity to fire. Passing fire effects also become active at this time (see
Passing Fire below). It is best to place the gun dice that will be available to each ship in groups behind it on the table. This allows players to immediately record the hit results wtihout losing track of which guns the target vessel can fire that turn. It also helps players keep track of which ships have fired already, because their dice for this turn have been removed from the table.
Multiple 6 Results – If during the course of
rolling his gun dice, a player rolls more than one natural six (showing six on
the die, not a modified six), each extra six rolled will immediately result in
a CR hit and a corresponding roll for additional damage on the CR line of the
Critical Hit table. For example, if a player rolls nine gun dice and the
results are 2,2,3,4,4,5,6,6,6, the player is considered to have rolled two
"extra" sixes and inflicts two CR hits on the enemy ship in addition to any
other damage suffered. Note that CR hits are categorized by hull or rigging origin, and modified by the gun size which
inflicted the original damage.
General Firing Example 1: A 100-gun ship of
the line with a B grade crew and a gun dice profile of 609 is going to fire her
nine heavy guns at a target that is less than 3" away under normal sail. Because this
is in the close range bracket, there are no reductions due to range, and her B
rating allows die rolls of three or higher to score hits at close range. Because the
heavy guns are being fired at a target that has normal sails, the hull targeted
dice used the +1 line and the rigging targeted dice use the +2 line of the Hit
Table. If the target ship were under battle sails, all dice would use the +1
line on the Hit Table.
General Firing Example 2: A frigate with a D grade crew and a gun dice profile of 040 is going to use her
four medium gun dice against a target that is 10" away under battle sail.
Because this is in the long range bracket, the number of gun dice is quartered
to one and her D rating allows only die roll pairs of 6 to score hits (shown
as "12" on the combat chart table). Because of this, the player does not roll because a minimum of two dice would be needed in order to have any possibility of scoring a hit. If the target had been in medium range, the frigate would get two dice (halved for range) and could score hits if either rolled a 6.
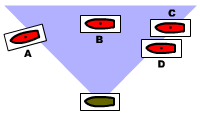 Fig. 1 – Arc of Fire Targets. Fig. 1 – Arc of Fire Targets.
Ship A represents a vessel which is just moving out of the arc of
fire. Because part of its stern still lies within the arc, it may be fired at.
Ship B is entirely within the arc and may be fired at. The center-point of ship
C lies just within the arc, and so it may be fired at. The center-point of ship
D lies just outside of the arc, and so it may not be fired at because the ships
is only just moving into the arc of fire and does not yet represent a broad
enough target. |
« 4.1
Targeting
Arcs of fire – A ship may only fire its
cannon at targets that are within limited arcs-of-fire. These arcs are anchored
off the port and starboard sides of the ship, and their breadth or "sweep" is
different depending on the time period of the battle. Early in the period
covered by Admiralty, the average arc-of-fire was about 10°. By the middle
of the period most ships had been converted to allow their guns a 45°
arc-of-fire. See the Ship Values for more information about arcs-of-fire for
individual fleets.
Ships which are moving into an arc of fire may only
be fired upon if their center-point lies within the boundary of the arc. Ships
which are entirely within an arc of fire may always be fired upon, assuming
they are within range. Ships which are moving out of an arc of fire may be
fired upon if any portion of the model lies within the arc. See Figure 1 at
right. Note that because all game movement is conducted in steps, the actual
ship models will all be stationary at the time that firing is resolved.
However, the ships will often represent objects which are moving in relation to
each other. Because of this, the rules will discuss abstract ideas, like ships
which are considered to be moving, as in "moving into an arc of fire" even
though both models are setting still at the time the observation and firing are
done. Whether a ship is considered to be motionless for game purposes is
decided by its movement (or lack thereof) from the previous
turn.
Multiple Targets – In any case where numerous enemy
ships are within a vessel's arc of fire, the firing ship will target the enemy
which is in the closest range bracket and closest to the
attacker's line of fire. Such a ship is referred to as the primary
target. An exception to this is the case of a preexisting target.
If the ship fired upon last turn by a battery is still within the arc of fire
but is no longer the primary target, the firing player may choose either the
new primary target or the preexisting target. If two enemy ships are both
within the same range bracket and are also the same distance from the line of
fire, either ship may be targeted.
Example: A vessel which is in a closer range
bracket than three other vessels, but further away from the line of fire will
still be the primary target. If three vessels are all within the same range
bracket but are individually at different ranges, the vessel closest to the
firing ship's line of fire will be the primary target. All of these situations
are subject to the preexisting target option.
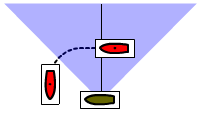 Fig. 2 – Valid Passing
Fire Fig. 2 – Valid Passing
Fire
The green ship may conduct passing fire against the red ship
because the red ship passed through more than half of the green ship's arc of
fire. |
Passing Fire – During the movement step, a
player may declare any of his ships as conducting passing fire as enemy vessels
pass through his own vessel's arc of fire. Passing fire may only be conducted
under special circumstances, and it is designed to prevent viable targets from
slipping out of a ship's arc of fire in conditions which normally would have
resulted in a vessel firing or taking fire. Players should keep this last note
in mind during the game, as it is nearly impossible to create rulings to cover
every eventuality. In the case of unusual circumstances the general intent of
the rules should be kept in mind.
Passing fire is considered to be
simultaneous to all firing which occurs during the Fire phase, and damage
inflicted as a result of passing fire only becomes effective at the time all
other damage for the turn becomes effective at the conclusion of the Conduct
Cannon Fire step.
In order to conduct passing fire, the player in
control of the firing vessel must declare that he will do passing fire either
as he moves his ship past an intended target, or as the enemy player moves a
ship which is a viable target. All passing fire must be declared while a vessel
is being moved. If a player is allowed to move his ship past an enemy vessel
and take his hand off the model or its base without anyone calling "passing
fire" against it, no passing fire may be done on that vessel. By the same
token, if a player moves a ship without calling passing fire, none may be
conducted by that ship.
Passing fire may only be conducted against a
vessel which (a) passes through more than half of a firing ship's arc of fire
or (b) presents a raking fire target. In order for (a) to occur, the target
vessel's center-point must have passed the firing vessels line of fire. See
Figures 1 and 2 at right. In order for (b) to occur, the target vessel must
present a raking target at any point during the move. Passing fire must be
conducted using all the weapons on the embattled side of the ship in question.
Vessels which conduct passing fire during the movement phase may not fire again
during the turn using the side or sides of the ship which fired.
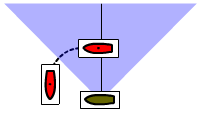 Fig. 3 – Invalid Passing
Fire Fig. 3 – Invalid Passing
Fire
The green ship may not conduct passing fire against the red
ship because the red ship moved through less than half of the green ship's arc
of fire. |
Target Types – When rolling for cannon fire, the
dice themselves are used to define the mix between hull targeted guns and
rigging targeted guns. Players should use two different colors of
dice for the two target types, but should still roll the gun dice all
at once, with one color assigned to hull hits and the other color assigned to
rigging hits (we usually use black for hull and white for rigging).
The ratio of dice used is decided according to the range
and the national doctrine of a vessel's parent fleet. As a general rule, the
gun dice mix for guns fired at long and medium range should follow a 75/25 mix.
A ship from a fleet whose national doctrine is to fire at an enemy's hull
should consider three-quarters of the dice rolled as counting toward the Hull
Target column and one-quarter toward the Rigging Target column, with a general
bias toward the dominant type. Fleets whose doctrine was firing at an enemy's
rigging should consider three-quarters of their gun dice as being for Rigging
Targeted fire and one-quarter for Hull Targeted fire. Hence, a French ship firing
only two gun dice of a certain size at medium or long range will likely fire
both of them as rigging targeted, but if rolling three dice will fire two at
the rigging and one at the hull.
An interesting option for medium and
long range fire is to mix the two dice colors into a can and blindly draw the
desired number for each firing. Adjusting the ratios of dice inside the can
could randomly show national differences while allowing unpredictable
fluctuations in targeting. This would completely randomize hull/rigging
targeting, and allows an interesting variety of options.
For close
range firing players can choose among several possibilities, but in general the
amount of heavy gun dice assigned to hull targets should be much higher. Medium and
light guns may be more selective about where they aim. Below are outlined
several possible methods of deciding close range dice mix. Players should
decide in advance which method will be used throughout a game, or roll to
randomly decide which method to use before the game starts.
Close Range Options:
Battery Targeting
(recommended) – Heavy cannon are always hull targeted, medium and
light cannon may fire any combination of their guns as hull or rigging
targeted.
Basic Targeting – All but one of the gun dice for each
type are hull targeted.
Advanced Basic Targeting – When firing
five dice or less, all may be hulled targeted. When firing six dice or more,
one must be rigging targeted.
« 4.2
Modifiers
All gun dice and cannon fire table modifiers are
cumulative. Use standard rounding (half rounds up).
Dice Quantity
Modifiers
Stern Rake – Double the number of dice if the
center-point of the firing ship lies within the stern zone of the target
vessel. Note that all gun hits which are caused by a bow or stern rake must be
evenly split between the two sides of a ship.
Bow Rake – Add
one-half (50%) to the number of dice if the center-point of the firing ship
lies within the bow zone of the target vessel.
Anchored – Double the number of dice if the firing vessel is
anchored.
Medium Range – Halve the number of dice if the target
lies within the medium range bracket.
Long Range – Quarter the
number of dice if the target lies within the long range bracket.
Wind
Speed 4 – Halve the number of dice if current wind speed has a "4"
rating.
Wind Speed 5 – Quarter the number of dice if the current
wind speed has a "5" rating.
Line
Modifiers
Weak Hull – Go up one line on the fire table
for hull-targeted gun dice fired against a vessel with a weak hull.
Stout
Hull – Drop one line down on the fire table for hull-targeted gun dice
fired against a vessel with a stout hull.
Heavy Firing – Go up
one line on the fire table if the gun dice being rolled are for heavy
guns.
Light Firing – Drop one line down on the fire table if the
gun dice being rolled are for light guns.
Rigging Target vs Normal
– Go up one line on the fire table for rigging-targeted gun dice fired
against a vessel using normal (full) sail setting.
« 4.3 Damage
Hits
During the course of the game a ship can suffer damage that
slowly reduces it ability to fight. In order to keep the game moving, we have
chosen not to concern ourselves with damage and hits that do not dramatically
affect the operation of the ship. Our main concerns are basic: Are the guns
still firing, can the ship still move and signal, will it sink soon? Those primitive
concerns and others like them are the concerns of the moment for Admiralty.
There are two basic types of damage in the game: static and active.
Static damage happens once and doesn't need to be bothered with any further.
Active damage is something that can somehow trigger additional damage, maybe
immediately, maybe later in the game. The most common
types of damage are suffered from the Hit Table. Less common types of damage
are inflicted through the Critical Hits table. All types of damage inflicted
should be recorded on the ship log under the name of the ship which has
suffered the damage. A few damage types can be repaired, a function which is
discussed more in Section 6 -
Repairs.
Below is a master list of each damage type and its
respective effects.
| Damage Code Glossary |
| A |
Anchor |
Mark one
A in the Critical Hits box of the ship log.
A ship with more than two anchor hits may not anchor during the game. If the anchor hits are
sustained by a vessel already anchored the vessel may remain anchored, but if
it cuts cables it is considered to have no replacement anchors and may not
anchor again during the game. |
| B |
Blocked Gun Dice |
Mark a B at the bottom of
the appropriate Gun Dice box for each B hit. For multiple B hits, add more B hits alongside the first one.
Each B
hit should be randomly located either on the port or starboard side of the
ship, not both. Each B Hit causes the temporary suppression of one of each gun die weight on that side of the ship. As with any suppressed
feature, suppressed gun dice may not be used until the B hits have been
cleared (repaired).
Example: A ship with a Gun Dice value of 255 that has two B
Hits marked on its Starboard side, may only fire three medium and three
heavy gun dice. It is effectively a 033 on that side of the ship until the
blocked guns are cleared using repair die rolls. |
| C |
Carronade |
Reduce one of the
carronades values (if any) shown in the Gun Dice box. Each C hit should be
randomly located either on the port or starboard side of the ship, not both. If
a target vessel does not have any carronade weapons, inflict one normal G hit
instead. |
| CRH |
Hull Critical Hit |
Refer to the CRH line of the
Critical Hit table and roll one six sided die. Inflict the resulting damage
codes and, if necessary, roll for their effects also. Note that the gun size
modifiers from the Hit Table are also used for critical hit die rolls: A
critical hit roll triggered by light guns will suffer a minus one (-1); A
critical hit roll triggered by heavy guns will receive a plus one (+1). |
| CRR |
Rigging Critical Hit |
Refer to the CRR line of the
Critical Hit table and roll one six sided die. Inflict the resulting damage
codes and, if necessary, roll for their effects also. Note that the gun size
modifiers from the Hit Table are also used for critical hit die rolls: A
critical hit roll triggered by light guns will suffer a minus one (-1); A
critical hit roll triggered by heavy guns will receive a plus one (+1). |
| CR2 |
Critical Hit 2 |
Refer to the Critical
Hit 2 line of the Critical Hit table and roll one six sided die. Inflict the
resulting damage codes and, if necessary, roll for their effects also. The CR2
line inflicts less common types of damage such as anchor, officer and pump
hits. |
| E |
Explosion |
Immediately refer to
the Explosion line on the Critical Hit table and roll one die, recording all
damage that happens as a result. Keep the I hit which triggered
the explosion and continue rolling each turn for additional
explosions.
Any ships within 1" of an exploding ship must roll on the
Explosion hit line with a minus two (-2) modifier. Ships within 2" of an
exploding ship must roll on the Explosion line with a minus four (-4)
modifier. |
| F |
Fire |
A small fire is burning on board. Mark
an F in the Critical Hits box of the ship log. At the start of
each Fire Phase, roll for each active F hit on the Fire line of the Critical
Hit table and apply the results. |
| FD |
Fire Danger |
Immediately refer to the Fire Danger
line on the Critical Hit table and roll one die, recording any fire that is
started as a result. |
| G |
Gun
Hit |
Mark the number of
G Hits in the Gun Hits box of the
ship log. Gun Hits should be marked off on the embattled side of the
ship (the side of the ship facing the direction of the attacker). G
hits coming from directly ahead or behind (I.E. - from raking fire) should be
evenly split between the two sides of the ship. If all of the gun dice on the
nearest side of the target ship have been destroyed, gun hits are then to be
applied to those guns (if any) which are still intact on the other side of the
target ship.
Each Gun Hits tallies to the 5:1 GD Ratio for either side of the ship (the ratio is noted at the bottom of the Gun Hits box in the ship log) mark off one Gun Dice. If necessary an extra die roll should be done to randomly decide which gun weight is lost. |
| GD |
Gun Dice |
Randomly reduce one of the remaining Gun
Dice values shown in the Gun Dice box, choosing the side which corresponds to
the adjoining Gun Hits box. One GD hit is suffered for every five gun hits.
Once the GD hit is recorded, cross out the contributing gun hits.
Example: A
ship suffers eight G hits on its port side. Write a "5" in the gun hits box, cross it out
and reduce one randomly selected port side Gun Dice value by one
point. Write a "3" next to the crossed out "5" to continue tallying toward further hits. For this example a 609 value ship would reduce to 608 or 509, but not 508. A
zero value cannot be reduced. This example would leave the vessel minus one gun
die, with three G hits remaining active (not crossed out) in the port side Gun Hits box. |
| I |
Inferno |
A major fire is
burning on board. Mark an I in the Critical Hits box of the ship
log and cross out the F hit which triggered it. At the start of each Fire
Phase, roll for each active I hit on the Inferno line of the Critical Hit table
and apply the results. An inferno cannot be put out. Critical hits that occur
as a result of an inferno do not replace or eliminate the inferno in the same
manner as an inferno replaces a fire. Instead the inferno will remain to cause
additional critical hits, eventually consuming the ship in explosions and
rigging collapse. Ships with an inferno burning on board will stop all firing
and boarding actions and may not voluntarily move within 1" of any other
ship.
If a ship is locked to another vessel with one or more inferno
hits, it must roll a fire danger (D) check for each inferno burning on board
the other vessel (see turn sequence). |
| L |
Locked |
Mark an L in the Critical
Hits box of the ship log along with a note indicating to which enemy ship the
vessel is locked. Note that ships may be locked to each other (both with L
hits) or just one may be locked to another (just one with an L hit). Ships with
their own L hits and those which have other ships locked to them are all
considered stopped as a group and may not rotate in place, regardless of sail
settings. |
| M |
Mast |
Each Mast Hit triggers an immediate critical hit die roll for additional Sail Hits. There is no need to record mast hits in the ship's CR Hits box.
|
| O |
Officer |
Mark an O in the Critical
Hits box of the ship log. This indicates the loss of senior officers who control the ship. O Hits cause negative modifiers for actions, boarding and signals. |
| P |
Pump |
Mark a P
in the Critical Hits box of the ship log. Pump hits allow Waterline hits to
take full effect, thereby threatening the ship in case of severe damage. A ship
with no pump hits may suppress two W hits each turn. A ship with one pump hit
may only suppress one W hit each turn. A ship with two or more pump hits may
not suppress any W hits. |
| R |
Rudder |
Marked an R in the
Critical Hits box of the ship log. One rudder hit reduces to two the
number of turning gage steps that a ship may use to turn (meaning that the ship
can now only wear and not tack). An additional R hit reduces that number to
one after which the ship is functionally unable to turn – the
rudder is considered destroyed. A ship with a destroyed rudder must set its
sails to a stop position (if possible) and attempt to anchor. If the ship's
anchors and rigging are also destroyed, it may not conduct any type of
voluntary movement (the ship may be subject to optional drifting rules if those
are part of the game scenario). |
| S |
Sail |
Mark the number of
sail hits in the Sail Hits box of the
ship log. Each time Sail Hits tallies to the Sail Speed (SS) Ratio (recorded at the bottom of the Sail Hits box in the ship log), mark off one Sail Speed level. This typically reduces Battle Move speed by one-inch (half-inch for smaller scales). Cross out the tally line that triggered the sail speed drop to prevent accidental reuse. If the Battle movement of a ship falls to a level equal to the Normal bonus, the normal bonus will begin to lose the same levels in unison with any further reductions in the Battle speed.
Example: If a ship suffers 20 S Hits and its Sail Speed Ratio is 13, write a "13", cross it out and reduce the vessel's speed accordingly. Write a "7" next to it, to begin a new tally line. If the ship suffers another four S Hits, cross out the "7" and write "11" next to it. Once that second tally line totals another 13 points, the vessel loses another speed level, etc. |
| W |
Waterline |
Mark a W in the Critical
Hits box of the ship log. Waterline hits cause a progressive series of effects
which result in the loss of the ship. Waterline hits cannot be repaired at wind
speed 5 or greater. One W hit each turn can be rendered ineffective (suppressed) if the pump if not damaged. See the Critical Hits box for the list
of waterline hit effects. |
| XX |
Repaired |
Cross out (deactivate)
the critical hit in question. In the case of an F Hit the fire is considered
put out. In the case of an M hit the mast or yard is considered repaired enough
to prevent further damage. In the case of a B Hit, the rigging wreckage is considered cleared away by whatever means necessary. |
| |
|
|
|
|
|
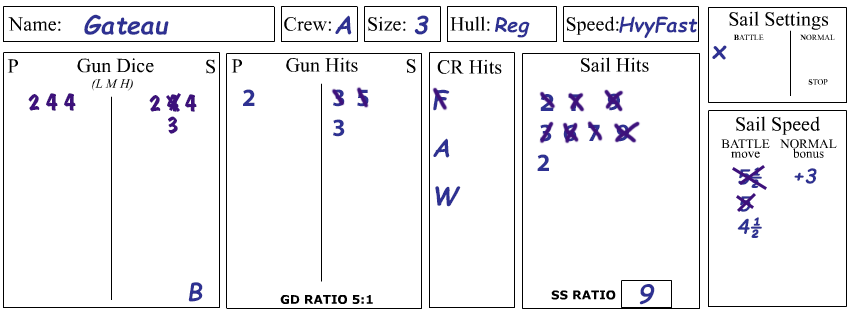 |
Fig. 4 – Recording Damage on Ship
Log
On the ship log shown above, the 1/2400 scale Gateau has suffered a
total of ten gun hits, but because of their distribution, only one gun die has
been lost as shown by the crossed out medium gun die on the starboard side.
Also note that the block of five gun hits that caused the loss of that gun die
were crossed out to prevent accidental reuse. The ship already has three more gun hits to starboard (and two to port) and so
two more gun hits on that side will cause the loss of another gun die. All gun
die loss weights (light, medium or heavy) are rolled for randomly, players may not choose which gun dice to
lose. The ship also has blocked guns due to a rigging related B Hit. This blocks one each of the starboard size gun dice, effectively reducing the ship to a 123 rating on that side until cleared.
The same ship previously had a fire burning on board (F hit in the CR Hits box) which was
later extinguished. It also has an anchor (A) hit and a waterline (W) hit.
The ship's Sail Speed (SS) Ratio is a 9, which means that for every nine Sail Hits, it loses a half-inch of Battle Sail speed. So far it has suffered the nine-point tally twice and lost one-inch of speed (two events of a half-inch reduction each). There are also two more active hits tallied that count toward a third possible sail speed reduction. Also note that the ship's current sail setting is Battle, which has not changed since the start of the battle. If the ship's Battle move falls to 3", any further level reductions below that will also start to drag down the Normal move bonus. Example: If the battle move falls to 2", the Normal bonus will also have fallen to +2".
|
|
« 4.4 Critical
Hits
The Critical Hits box on the combat chart controls the ongoing
side-effects caused by damage hits. Some critical hit results will be recorded
in the ship log, and others will be immediately acted upon in the form of
additional hits and die rolls. Each critical hit line contains a line of blank
spaces and damage hits which correspond to the die roll lines above them.
Rolling one six sided die and cross indexing the result with the corresponding
hit type will give the result. Each result matches a damage code which is
outlined on the combat chart and defined in detail in section 4.3 above.
« 5.0
Boarding
In order to conduct a boarding action, a ship must be
stationary and within a half-inch of a stationary enemy ship. The vessels may be
locked together, but they do not have to be in order for a boarding attempt to
be made. They may be in any attitude to each other, and may have any sail
setting. Boarding actions do not take place automatically. They must be
declared by a player who controls the ship initiating the boarding attempt, who
is then referred to as the attacker for the duration of that boarding try. The
player whose ship is being boarded is considered the defender. All boarding
attempts are considered simultaneous, and are resolved during the Boarding
phase of the game.
« 5.1 Conducting a
Boarding Action
Players begin the boarding phase by declaring all
qualified ships which will attempt a boarding action. If two opposing ships are
declared against each other, only one may be an attacker. In such a case, each
player rolls one six-sided die. The player who rolled the highest value
(re-roll tied die rolls) becomes the attacker. Once all boarding attempts are
declared and all attackers and defenders defined, players resolve each action
separately.
Boarding Attempts – Once all boarding attempts
are declared, players accumulate dice according to the Boarding Attempt
table and roll once for each attempt. This establishes which attempts turn into
boarding actions and which do not. It does not matter which player rolls the
boarding attempt dice. The meaning of the Boarding Attempt lines are as
follows:
Starting Dice – Every boarding action
test begins with two default dice (shown as "x2 Starting Dice" on the Boarding Table).
Ships Fouled – Add one die if
any of the combatant vessels are fouled (locked) with each other.
Size
Difference – Subtract one die if any of the combatant vessels are
different sizes.
Once the boarding attempt dice for an action is decided, they are rolled. Any one die roll result of 6
means that a boarding action has begun. Once a boarding action begins, no
further attempt rolls are required for that action. It will go on until one
side wins, withdraws or surrenders, even if that takes several turns. If no
6 is rolled, no boarding action developed for that
attempt and players must wait until the next turn's boarding phase to
roll again. Note that boarding attempts will always use between one and three
dice, and that one roll is done for each attempt. The result will be some
boarding attempts turning immediately into boarding actions, and others
sputtering along as the crews just don't manage to get across to the enemy
ships.
Boarding Actions – For each new boarding action,
players refer to the Boarding Dice table to establish how many dice they can
use for the action. Once both sides have gathered the proper number of boarding
dice, they simultaneously roll them, which is called one round of die
rolling. A maximum of two rounds of dice may be rolled per boarding action per
turn. For each round of die rolls, each side compares or "opposes" their three
highest values against the three highest values rolled by the enemy ship, with
the high value for each opposed pair being the winner. The losing dice are
removed, and any dice involved in ties remain. A player facing someone with
fewer dice than the three dice allowed may add the points from his unopposed
die (or dice) to those dice which are still being compared against enemy
dice.
Example: Player A has a size 2 ship that is
attacking player B with a size 3 ship. Each side has mobilized an extra
boarding die by reducing five gun dice for the pending action. Player A will
start with three dice: two for the ship's size, and one for the mobilized gun
dice. Player B will start with five dice: three for the ship's size, one for
being defender and one for the mobilized gun dice. For the first round or
fighting, Player A rolls 5, 5, 1 and Player B rolls 5,4,4,3,3. So the top value
for each (5 vs 5) are ties. The second highest values for each (5 vs 4) cause
Player B to lose one die. The third highest values (1 vs 4) cause Player A to
lose one die. So each side lost one die in the first round.
Now Player
A has two dice and Player B has four dice and they roll again. Player A rolls
5,2. Player B rolls 4,4,2,1. So the two highest are 5 vs 4, but because Player
A now has only two dice to oppose the three "frontline" dice for Player B, Player B may
use his third highest die value to apply to his highest value, turning his 4
roll into a 6. Since the second highest for each is a 2 vs 4, Player A loses
both remaining dice and the boarding attempt has failed. Not only has Player A
lost the boarding attempt, but the loss of all dice means that the previous
temporary loss of five gun dice becomes permanent.
For boarding actions left over from the previous turn,
players will use the same number of dice as before, the only modification
allowed being the addition of one die which can be added through the
mobilization of gun dice. This may only be done to replace losses from the
previous turn's boarding action, and is limited to the addition of one die per
turn using this method.
In order to win a boarding action, an attacker
must fight until the defender runs out of boarding dice, and which time he is
considered to have captured the enemy ship. A defender wins a boarding action
if the attacker cancels his boarding attempt or runs out of boarding dice. A
defender does not capture the attacker's ship if the attacker runs out of dice,
and must declare a new boarding attempt if he wants to board the former
attacker's ship.
An attacking player may call off a boarding action at
any time. Even a boarding attempt which has gone several rounds during which
the attacker has made vital gains may be called off. To do so, the attacker
declares that the attempt to board has stopped and no further die rolls are
made.
Boarding Dice – Each player begins a boarding
action without any dice. Dice are only added and subtracted according to the
Boarding Dice list. If a boarding dice list entry does not apply to a
particular action, it is ignored. All boarding dice entries are cumulative. For
example: If a ship is both defender and has an A grade crew, it will receive
one die for each. Dice are totalled until both sides have all the dice they are
able to gather for the action. Below are the definitions of each boarding die
qualifier and its application:
Starting Die – Each side starts with one boarding die.
Each size point – Add one die for each
size point of each ship involved. A size three ship (a three decker) will gain
three dice, and size two ship will gain two dice, etc.
Defender – Add one die for the
boarding action defender.
Mobilized 4 GD – Add one boarding die
if a ship has mobilized four gun dice for this purpose during this turn's
earlier command phase. Players may mobilize a maximum of one boarding die per turn in
this manner: Once to start a new boarding action; and later to replace lost any
boarding dice (not restricted to replacing boarding dice raised from gun dice, which are last to be lost in any case). A player which has not lost any boarding dice may not mobilize
extra gun dice if one has already been mobilized.
Each crew grade higher – If one ship's crew is of a higher crew grade than the other, the better crew gains
one die for each grade level higher they are over the inferior grade crew.
Officer hit(s) – Subtract one die
if that ship has one or more Officer Hits.
Each 6 G Lost – Subtract one die for every six gun dice that have been lost by the ship. If
there are multiple attacking ships, use the hit status of the least damaged
vessel.
« 6.0
Repairs
During the Repair Phase of the game, players may attempt to
fix some damaged portions of their ships by rolling 1D6 on the Repairs table. Only one repair attempt may be made per hit type, per turn. All repairs are conducted
using the Repair box located on the combat chart. Adjoining each repair type is
listed the die roll value needed to achieve that repair. Below is an outline of
each possible repair type and its limitations:
Unblock B Hit – Players may roll for
one B hit currently active on either side of a ship. As each hit is repaired,
it is permanently crossed off.
Repair Pump – On a die roll of 6, one P hit may be
crossed out.
Repair W hit
–On a die roll of 6, one W hit may be
crossed out. W hits cannot be repaired at wind speed 5.
Repair L hit – On a die roll of 6, one L hit may be
crossed out. The ship that it
is locked to may not be an enemy ship that has not surrendered or given up
combat due to on-board flooding or fire emergencies (e.g., you may not
unlocked yourself from a still-hostile enemy vessel). A ship must repair its
own L hits before lending aid to other ships. A ship with no L hits may roll to
attempt repair of any one L hit suffered by a friendly or surrendered enemy
ship with which it is locked.
Emergency L hit repair – A ship
may automatically repair one L hit by taking 30 S hits, recording them on
the Sail Hits box and immediately applying the sail speed effects. A ship conducting this action is
essentially cutting away anything which may be interfering with the two
vessels. The only good reason to do this will usually be if a ship is locked to
another vessel which has caught on fire or burst into an
inferno. |

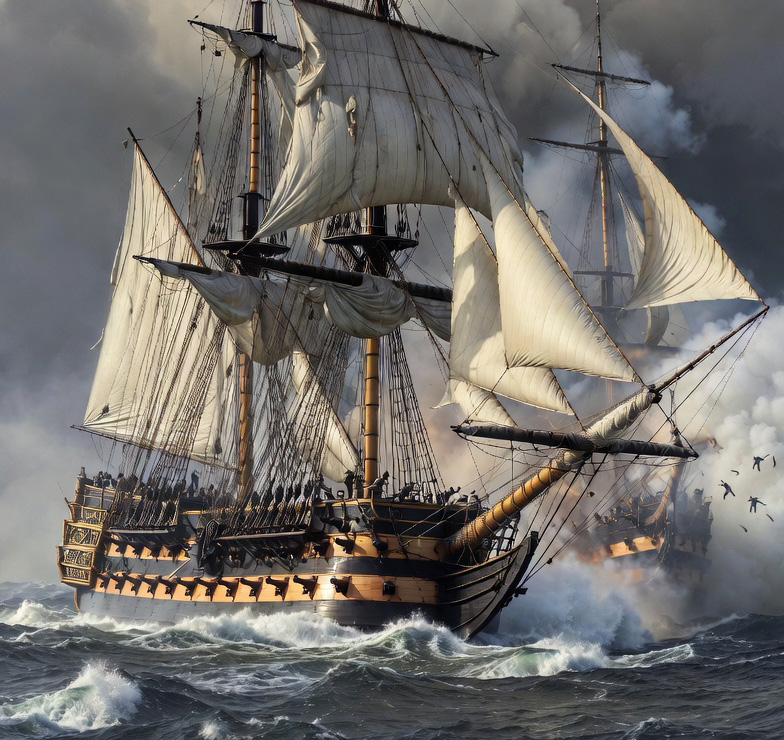 Admiralty is a set of miniature wargame rules that
re-create battles from the age of the fighting sail. The game concentrates on
the core features of period naval combat, including sailing, cannon fire and
boarding actions. The rules are geared to allow large battles to be fought over
realistically scaled areas of the ocean as players struggle to pummel, dismast
and capture their opponent's vessels. Admiralty is split into six sections,
each of which deal with a particular aspect of the game, which includes playing
aids such as ship logs, firing arcs and the all-important combat chart. Last updated: December 28. 2025.
Admiralty is a set of miniature wargame rules that
re-create battles from the age of the fighting sail. The game concentrates on
the core features of period naval combat, including sailing, cannon fire and
boarding actions. The rules are geared to allow large battles to be fought over
realistically scaled areas of the ocean as players struggle to pummel, dismast
and capture their opponent's vessels. Admiralty is split into six sections,
each of which deal with a particular aspect of the game, which includes playing
aids such as ship logs, firing arcs and the all-important combat chart. Last updated: December 28. 2025.