Mast and Rigging Guidelines
| For players who want to add details to their ship castings, masts will usually be one of the first things that come to mind. The casting process itself does not allow any but the heaviest military masts as part of the models, and any lighter masts need to be added. The materials and steps required to add masts are fairly simple and requires only a bit of extra time. Below are a few guidelines for adding masts, spars and rigging. |
| Materials Photos – There were many different mast configurations for ships of various periods, so it is best to have at least one photograph of the ship you want to customize. Other than on-line sources, the Conway's Fighting Ships series is the best single source of images as well as being a goldmine of information about the ships themselves. Rods & Wire– The first and most important item to buy will be the rods or wire used for mast building. For the main vertical mast I use .020" styrene plastic rods made by Evergreen Scale Models. For the topmasts and spars I use 32 gauge Tie Wire like that used for floral arranging. If the only fine wire you can find is that wound in paper, the paper can easily be stripped away. Adhesive – The best type of adhesive to use is Loctite brand Superglue Gel, especially in the "Control" bottle. I previously used Advanced Formula Krazy Glue, but the new (as of late 2005) Superglue seems to work much better. Tools – For clipping wire, the best tool to use is a nail clipper because of its ability to shear a clean, flat end on the wire. Using diagonal cut pliers is not as good because of the V-shaped tip it leaves after cutting. Also required will be a pair of wide tweezers for holding the wire pieces in place while the instant glue hardens. 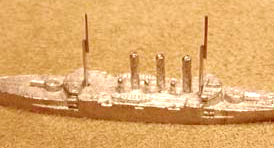 Masts MastsI like to use styrene plastic for the main vertical mast because the completed mast assembly will flex slightly if bumped, thereby helping to prevent unwanted breakage. If the "Flexmast" does indeed break, it is easily glued back or replaced by another length of mast. The first step in mast building is to make sure the ship casting is clean and free of any primer coating. Make sure your mast segments are pre-cut and ready for gluing, and have a small flat of aluminum foil with a bit of SuperGlue squirted onto it. Grasping a mast with your tweezers, dip one end in the glue - enough to leave a small blob of it on the end of the mast - and then quickly but firmly plant the glued mast-end onto the ship's deck. WTJ Naval miniatures usually have small dimples in their decks in order to allow a pool of adhesive to form beneath the mast, making for a firmer bond (the dimples also serve as center-drill points for those who want to drill holes for ultrasolid mast building). It is usually better to install main vertical masts which are taller than required. The masts can be trimmed to length after the adhesive dries. Once the main vertical masts are installed and trimmed, the topmasts need to be installed. Using the same general method as above, grasp the pre-cut topmast segments (which will usually be 30 or 32 gauge wire) and dip the side of the wire at one end into the SuperGlue. Quickly and gently hold the wire against the existing upper side of the main vertical mast for several seconds. You will need to make sure the topmast is being held vertically and not at an angle to the main vertical mast. Lightly blowing on the bonding area probably helps. Once the glue seems to be taking effect, let go with the tweezers and manually do any quick, last second adjustments that might be necessary. As with the main vertical masts, installing long topmasts and then trimming them to length is usually best. The image above right shows a rough casting of the Japanese cruiser Idzumo with her main vertical masts and top-masts in place. Note that most top-masts were attached to the front of the main masts. This model does not yet have any spars installed. 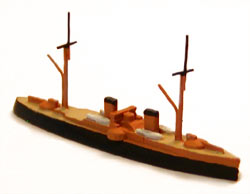 Spars SparsSpars are the cross-beam type structures that rest across the masts. They will almost always be made of 32 gauge wire. As with the masts, grasp a pre-cut spar segment and dip the middle of it into a tall, slender glob of SuperGlue (the superglue gel is easy to pile up). Then hold the spar against the appropriate position on the mast until it has set. As with the topmasts, you may need to let go of the spar before the glue has fully set in order to make some quick adjustments. If the glue sets firmly with the spar slightly askew, let everything dry completely and then use two pairs of tweezers to trap and bend the spar lengths into position. The glue is so strong that it will usually accommodate such prying. At left is a photo of the Spanish battleship Pelayo with a full set of topmasts and short spars. Tips and Hints Make sure the tip of the wire does not have oil from your hands on it. The contamination may weaken or prevent the adhesive bond. Sometimes you may tack an item in place and then add a heavier layer of glue to strengthen the bond. If a section of mast breaks off of a ship that has already been painted, you may very well be able to glue the mast right back into position. The styrene bonds readily to itself or the pewter casting. If you accidentally primer a model before trying to glue masts into place, the glue will not stick. However, you can use a first round of gluing to pull away the primer, thereby leaving a small spot for the mast to be attached. You may want to use a kind of jig for attaching topmasts by cutting a notch into a piece of heavy balsa wood. By using the block of balsa as a kind of bridge over the model, hold the topmast wire against it and then slide the entire setup until the topmast wire is against the main mast. This may allow for a more stable installation of topmasts. |