| |

REPUBLIC
GRAND TACTICAL WARFARE IN THE AMERICAN CIVIL WAR
|
Republic Combat Chart
Guide
Introduction
The
various tables on the Republic combat chart are used to resolve combat
results, calculate unit effects and offer references for game play. The tables
themselves are generally cross reference style, designed to save game time by
compounding several actions together into one sequence. The following guide is
based on the standard medium scale combat chart designed for 15mm to 18mm
figures. Last updated January 27, 2025. |
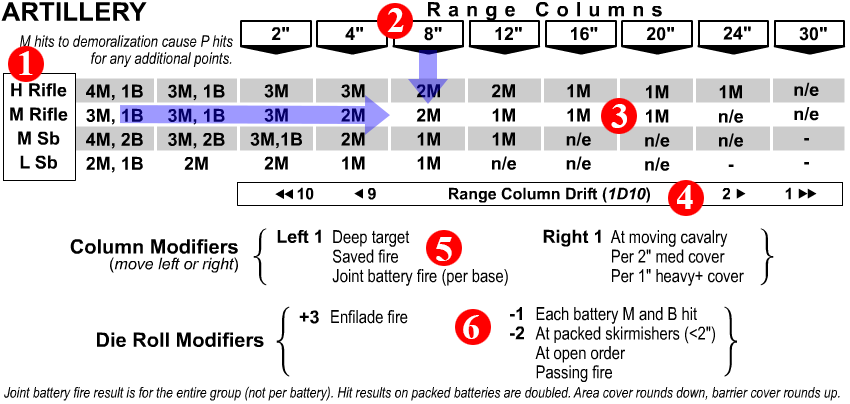 Artillery Table Artillery Table
This table is used for resolving
artillery fire effects against combat bases and skirmish marker bases.
Resolution of artillery is covered in Section 4 of the Republic rules, and
artillery fire takes place in the third phase of each player
turn.
Individual Battery Fire
For an individual battery firing
on a target, start with the H Rifle (Heavy Rifle), M Rifle (Medium Rifle), M Sb (Medium Smoothbore) or L Sb (Light Smoothbore)
line that matches the firing battery (number 1) and cross reference it
with the corresponding range columns (number 2) as approximately shown
by the blue arrows. The resulting cell in the results field (number 3)
will be your basic result. In the case of this example, the blue
reference arrows point at a basic result of 2M (two morale hits).
Next
step is to apply any applicable range column modifiers (number 5), which
cumulatively move the results cell to the left or right. Then roll 1D10 and modify it using the die
roll modifiers (number 6). Take the modified die roll value and apply it
according to the Range Column Drift (number 4). For modified
results of 3 through 8, there is no further effect
to the results field. For a modified drift value of 10 or
greater, the result moves two cells to the left, for a modified 9, the result moves one cell to the left, for a modified 2 the result moves one cell to the right and for a modified 1 the result moves two cells to the right (as reflected by the
numbers and pointers shown in the Range Column Drift line).
Joint
Battery Fire
For mass battery groups of two or more artillery bases,
players may combine their fire onto targets for greater effect. Start with the
same H Rifle, M Rifle, M Sb or L Sb lines and cross reference them the same way as with
individual batteries. The key difference is that the column modifier for Joint
battery fire (per base) allows the player to bump the result cell one to the
left for each artillery battery base in the joint fire group (mass battery).
This means that (for example) a mass battery of five medium rifles firing at 10"
would start with a 1M and count five cells to the left, for a 3M, 1B result (so
far). All other column modifiers are applied, and the drift die is rolled like
before. After applying any further range column
drift (if any), the final modified cell result is the result for all bases in
the mass battery (i.e., unlike individual battery fire, the result is not per
base firing).
In this example, if there was no further
modification, the five gun battery would inflict three morale hits and one base
hit.
Artillery Fire Example #1: A
medium rifle artillery battery is firing on a four base infantry regiment in assault
column (four bases deep) at a range of 7", this is the basic result
example of 2M shown with the blue arrows in the example figure using the
8" column. The deep target condition of the target (four bases deep) means the
cell will move one to the left for a 2M result. The attacking player
rolls 1D10 with a 9 result, which moves the cell one more to the
left for a final fire result of 3M against the target. If the player
had saved fire, the final fire result would have been
a 3M, 1B (total of three cells to the left for deep target, saved fire and the favorable Drift die roll).
Artillery Fire Example #2: A joint
battery fire group of three heavy rifle artillery bases is firing on an unformed
infantry regiment in line at a range of 10½" (which uses the 12" range column) with another infantry
regiment in line 1¾" behind it. Only the Joint battery fire modifier
applies, moving the result three cells to the left, for a running result of 3M
(under the 2" range header). The attacking player rolls 1D10 with a 6 result, which does not modify the cell position any further. The front
regiment would suffer three morale hits and become demoralized. The other regiment
to the rear would suffer one M hit due to the tandem target rule. If the
player had rolled a 10 on the die, the final fire result would
have been a 4M, 1B on the front target unit, causing it to become lose a base, become demoralized and suffer one panic hit due to the morale hit "overload." |
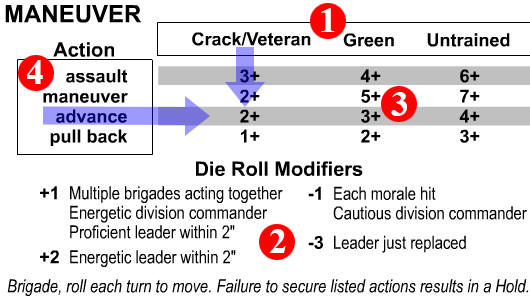 Maneuver Maneuver
This table is used to control whether a brigade can conduct a particular type move or maneuver. Start with the column that matches the unit's troop grade (number 1) and roll 1D10, applying any corresponding die roll modifiers (number 2).
The numbers listed in the main results field (number 3) will indicate which actions (number 4) can be taken. In order to execute the respective actions listed, the modified die roll must be equal to or greater than the number shown in the results field.
Example: A Green unit with one morale hit and an energetic leader within 2" rolls a 2 on the die. The energetic leader raises the die roll result to a 4, and the morale hit reduces the tally back down to a 3. This means that the unit may pull back or advance (without triggering an assault), but it may not advance to assault or maneuver. |
Turn Sequence
The
Turn Sequence box shows a simple outline of the order in which the battlefield
commanders (players) issue orders, move their units and resolve combat. See
Republic rules section 1.7 Turn Sequence for more detailed information. |
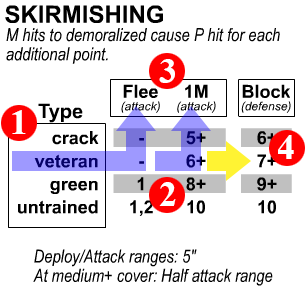 Skirmishing Skirmishing
This table is used to resolve skirmish
marker actions against combat bases and blocking actions against enemy skirmish
markers.
To conduct an attack: Start with the type of
skirmisher making the attack (number one) and roll 1D10. Match the
modified die roll with the value range shown in the attack roll results field
(number two) and then scroll up to the attack results (number
three) shown by the blue arrows. Depending on the modified die result, the
effect will be a morale hit (1M) on the enemy target or a Flee result which affects the attacking skirmish base. Any modified value
less than that needed to score a 1M hit is considered to be no effect on the enemy target. Any modified score that matches the 1 or 2 "Flee" result causes the skirmish marker to be picked up (it is considered to have fled back to its parent brigade). Note
that attacking targets in medium area cover or better halves the attack range within those zones.
To block an enemy skirmisher
(defense): Start with the type of skirmisher attempting the blocking
action (number one) and roll 1D10. In order to successfully block the
declared enemy skirmish marker, the modified die roll must be equal to or
greater than the corresponding Block/defense value (number 4) shown by the
yellow reference arrow. A blocked skirmisher may not conduct an attack that
player turn.
|
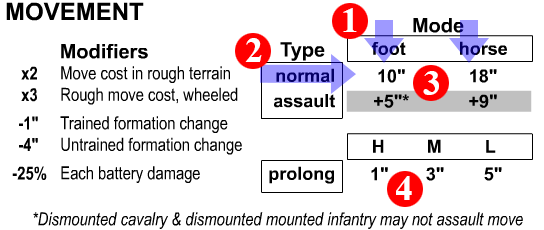 Movement Movement
The movement table shows the total distance
that a unit may move during each player turn. Start with the basic movement
type of foot or horse in the top row (number
one), and cross reference it with the movement mode (number two) as
shown by the blue reference arrows. The results in the distance field
(number three) will be the unit's allowable movement for the turn. There
are two basic types of movement; normal and assault. The normal movement can be fully utilized without any
other negative effects. If any of the assault movement bonus is used, the unit
will suffer a morale hit at the end of its player turn due to fatigue and
negative effects on the unit formation from having moved so quickly. The foot
and horse modes apply to all infantry, cavalry and limbered artillery bases
respectively (foot artillery uses the "foot" column, horse artillery uses the "horse" column, etc.).
Artillery: The table also shows allowable movement
for unlimbered artillery, known as prolonging. In order to find the
artillery's allowable prolong distance, reference the prolong row and
cross reference against the corresponding H, M or L to find that battery's
maximum prolong move (number four).
Modifiers: There are
three basic movement modifiers: Rough, Formation change and Battery damage.
Rough – The cost of movement is doubled while moving through
rough terrain, this means that for every inch the
unit moves, it actually consumes two inches of available movement (movement
cost is doubled, which is the same as movement being halved). This effect is in
force until all of the unit is clear of the rough terrain. For artillery and
other wheeled transport, moving through rough is even more difficult, with movement cost tripled (each inch moved, consumes three inches of
available movement).
Formation change – Units changing
formation will pay a
corresponding movement penalty for that turn's move. Untrained brigades suffer a minus four-inch (-4") movement penalty. Trained brigades (green or better) suffer a minus one-inch (-1") penalty.
Battery damage – A battery suffers a 25% loss of
mobility for each damage (B) hit it suffers. This means that with four or more base
hits, a battery become immobile.
Along the bottom of the Movement table
are reminder notes from the rules that relate to control and
movement of mounted troops when dismounted. |
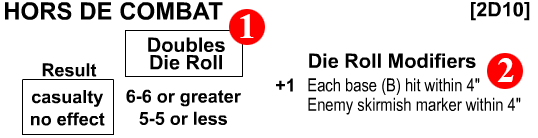 Hors de Combat Hors de Combat
To check for leader loss due to
death, injury or capture (hors de combat), roll 2D10 (number 1).
The rules do not distinguish between death, injury or capture; in the
grand-tactical scheme of things all that matters is the leader is no longer on
the line giving orders. If the die roll is doubles (two of the same number)
reference the Result table (number 2) to see whether the result is a
casualty. If the modified roll is a 8-8 or greater, the leader becomes a
casualty. If the modified roll is a 7-7 or less, there is no effect. Die roll
results that are not doubles also mean no effect (no death, injury or loss) for
this check.
All die roll modifiers shown on the right side of the table
affect the individual doubles numbers; for example if a player rolls a 6-6
having been within 4" of brigades which suffered two base hits (2B), the 6-6 becomes an 8-8 because of the "Each base hit" modifier. If a player does not roll doubles, the modifiers do not come into use
because non-double results are a no-effect. Checking for leader casualties is
the only time in Republic when 2D10 are rolled to gain a result. |
 Assault Assault
This assault table allows players to resolve
general combat (melee, volley fire, etc.) between opposing formations. At the
lower center of the table is a reminder of the basic steps to take for assault
resolution (number one). The first point to establish when resolving an
assault is whether the attacking side is making a general assault or an all-out assault (number two). Each assault type has a slightly different way of resolving, with general assault being somewhat safer for the attacker, and all-out assault raising the risk level for the modified result loser.
Follow these
detail steps to resolve the assault:
a) Each player rolls 1D10 and
applies all applicable die roll modifiers listed down the left side of the page
(number 3) to the roll result.
b) The attacker then subtracts
the defender's modified result from his own to arrive at the die roll
difference.
c) Refer to the die roll difference values shown in
the corresponding assault type (number 4), which will be either an
Attacker Advantage assault, a Pitched Battle assault or a Defender Advantage
assault. Each assault column includes qualifying conditions for that type
(infantry vs square, all vs cover, etc.). High rolling attacker values
(defender loses) force results that are above the zero line with results that
apply to the defending units (number 5, left side of columns). Low
rolling attacker values (attacker loses) force results that are below the zero
line and apply to the attacking units (number 6, right side of columns).
Ties or near-tie outcomes in the center of the column will force various
combinations of break-offs, re-rolls (of another assault round), morale hits
and other results.
d) Immediately apply the resulting panic and base
hits to the involved units according to the cavalry or infantry attacker type.
All initial assault rounds must be resolved before re-rolls and breakthrough
overruns are carried out.
e) Without re-rolling either dice, conduct
the same die roll difference comparison using only the natural
(unmodified) die roll numbers. The loser will suffer morale hits based
on the difference between the two natural die rolls. Those die differential M
hits are applied to the losing unit(s), based on their troop grade as posted
alongside the troop grade list next to the top of the assault modifier column
(number 7). Difference points are rounded down for calculating morale
hits.
The side which loses
the natural die roll will immediately suffer the required M hits (if any) even if the modified
assault table result is a tie or has a "roll again" result. The newly applied M
hit takes effect immediately and factors into any following assault
rounds. |
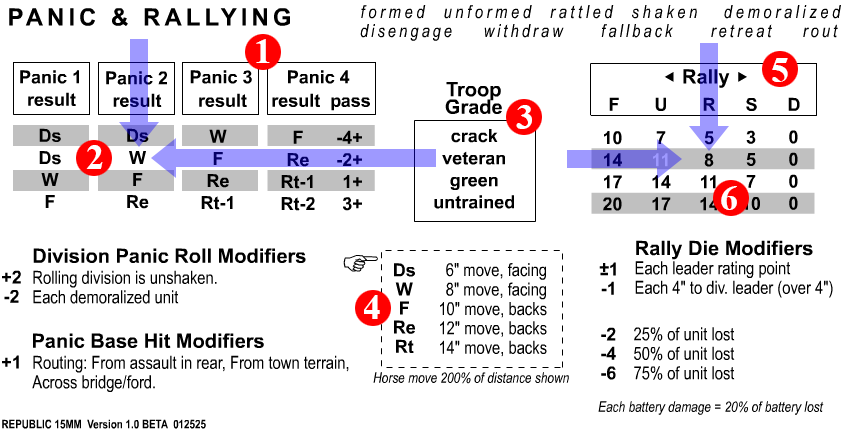 Panic & Rally Tables
This table is used
for the resolution of unit and formation panics, and for unit rallying. Along
the top of the table are two rows of reference text outlining the names of unit
morale conditions (formed, unformed, rattled, shaken, demoralized) and reaction
movements (disengage, withdraw, fallback, retreat, rout).
Panic
of a Unit
The number of panic hits a unit suffers due to artillery
fire and/or assault corresponds to the Panic boxes shown in a row across
the top of the left table (number 1). To find the panicked unit's
reaction, cross index the panic level (equal to the number of panic hits) with
the troop grade (number 3). The blue example arrows show the result for
a veteran unit with two panic hits (2P). The W
result in that cell would indicate a mandatory Withdraw move for the unit, which is defined in
the Reaction Box (number 4) as an 8" move backward, maintaining their
facing toward the enemy.
Panic of a Division
At the
end of the turn, a division will test for panic if any member units suffered a
total of four panic hits (4P).The hits do not need to have happened all at the
same time, the final total of four P hits in any one unit is the trigger point
for divisional panic testing.
To test for division-wide panic, cross
index the Pass column in the Panic 4 section against the division's average
troop grade (generally the majority troop grade present) and then roll 1D10 and
apply any applicable panic roll modifiers. If the modified die roll is equal to
or greater than the number shown, the division does not panic. If the modified value is less than the Pass number, all member units
of the division will suffer the reaction result shown in the same cell.
Rallying
The attempt to rally units that have morale
hits is one of the first things a player does at the start of their Command phase. To
conduct a rally die roll, note the rally table number that matches the
current condition of your unit. To do this, cross reference the troop grade
(number 3) and morale status letter (number 5) on the Rally table as
shown with the blue reference arrows, this is your old rally number (The morale status letters are abbreviations for Formed, Unformed, Rattled, Shaken and Demoralized). Roll 1D10
and modify the result using the Rally Die Modifiers. Apply the modified result
– positive or negative – to the old rally number. The resulting value is your new rally number which will correspond to one of the
morale ratings shown at the top of the column (number 5 again). That
rating is the unit's new morale status, which may represent an improvement,
worsening or no change of the previous (start of turn) morale.
|
Combat Chart Info
Strip
Somewhere on each combat chart sheet will be a copyright
notice, a note of which revision of Republic the sheet applies to, the
revision date for the particular sheet and a subtitle showing that it is a
Republic chart and which general scale it is set for. The revision date,
which will appear as a string of numbers, is valuable for finding out if a
combat chart you have printed at home is the latest version. Republic
revision dates use the six digit Month-Day-Year dating scheme. |
|
|
