| |

BATTLEFLEET 1900
PRE-DREADNOUGHT NAVAL WARFARE: 1890-1905
|
Combat Chart
Overview
Introduction
The various tables on the
combat chart are used to resolve combat results, calculate damage effects and
offer references for game play. For tables which require die rolling, a note in
the upper right corner will tell how many six sided dice apply to each die roll
entry on that table. Hence "1D6" means one six sided die is used for each die
roll, "2D6" means two six sided dice are used for each die roll. The tables
themselves are mostly cross reference style, although a few of them use
multiple cross references to guide players through several sets of options.
These actually save game time by compounding several actions together into one
sequence. The following guide is based on the standard combat chart. Where
necessary reference may be made to optional combat charts also available on the
Battlefleet 1900 home page. |
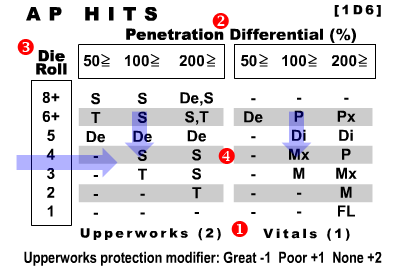 AP Hits Table –
Outline AP Hits Table –
Outline
This table is used for armor piercing (AP) incoming rounds.
Resolve these shell hits by rolling one six sided die for each round. Each
1 result is considered to hit the Vitals of the target, all
2 results are considered to hit the Upperworks of the target.
Once all hits are established, compare the penetration value of the
hits to the applicable armor value of the target vessel. The resulting
percentage variation or Penetration Differential is then cross
referenced with a second set of die roll results – one roll for each
upperworks and vitals hit – in order to arrive at the Hit Codes in the
body of the table. The hit codes are then added to the ship's log.
AP Hits Table – Details
Hit Dice: Once a player has
guessed the correct range to an enemy ship and scored a hit zone, one six sided
die is rolled for each incoming round to see which ones struck the target.
These should be rolled for in sets according to ship and shell size; for
example, if a ship lands four main rounds and seven secondary rounds into a hit
zone, roll one set of four dice for the mains, and another set of seven dice
for the secondaries (fourteen secondary dice if the secondaries have an ROF of
two). Using the standard chart, hit roll results of 3 through
6 are considered to have exploded harmlessly in the water, dudded
or to have struck portions of the ship not critical for game play. Each
2 result is considered to hit the Upperworks of the target, all
1 results are considered to hit the Vitals of the target. The
lower portion of the table (number one) acts as a brief guide to remind
players which incoming round die rolls count as Upperworks hits (2) and which
count as Vitals hit (1). Only those rounds which hit vitals or upperworks are
eligible to cause further damage to the ship. Note that the Fast Play
combat chart increases the incidence of hits by changing the vitals/upperworks
die rolls from a 1 and 2 to a 1,2 and 3,4 respectively.
Hit
Columns: All results are based on the percentage difference between the
penetration value of the striking round and the armor value of the area that is
hit. This is called the Penetration Differential. So for example if the
striking round's penetration value is half or more of the armor value for the
part of the target that was hit, use the 50 percent or greater column to check
for damage. If the penetration value of a striking round is equal to or greater
than the armor value for the part of the target that was hit, use the 100
percent or greater column. The column used must always correspond to the part
of the ship that was hit: Upperworks or Vitals. Those rounds which have an
armor penetration value less than half that of the armor in question cannot do
any damage.
Damage Dice: Once the correct Penetration
Differential column (number two) is established, roll one six sided
die (1D6) for each striking round. Cross index each modified die roll result
under the Die Roll column (number three) with the previously established
Penetration Differential column to find the code(s) for the damage
inflicted (number four).
Modifiers: Upperworks hits may
end up being modified by the Upperworks protection rating assigned to
each ship. Vessels which have Great, Poor or None upperworks protection ratings
will have damage dice against them modified by the amounts shown at the bottom
of the table. Hence any player rolling for upperworks damage against a ship
that has a Great rating will suffer a minus one (-1) to all upperworks damage
dice. These modifiers never apply to hit dice or any vitals damage dice.
The None protection modifier may result in a modified roll result of 8,
which is why there is an "8+" line on the chart.
Shell Hit Example #1: Four
30cm guns with a penetration index of 18-14-10 are fired at medium AP range
(second range bracket) onto a battleship with 14-5 armor. The shell penetration
will be 14, and the battleship armor is 14 for vitals and 5 for upperworks.
Assuming the firing ship scores a hit zone by guessing the correct range, it
rolls four dice - one each for the four main guns. The die results are a
2, 5, 5 and 6. Two hits
are against the target upperworks and one is against the vitals. This means
that the players would check for damage effects by rolling once on the 100>
column of the vitals portion of the table and twice on the 200> column of
the upperworks portion of the table.
If the final damage die rolls were
a 1 and a3 for the upperworks hit and a
4 for the vitals hit, the target battleship would suffer one
secondary position damaged and one main position destroyed. The secondary
damage was caused by one of the upperworks hits and the destroyed main was
caused by the vitals hit.
Shell Hit Example #2: Four 20cm
guns with a penetration of 8-5-3 are fired at long AP range (third range
bracket) onto a cruiser with 8-4 armor. The shell penetration will be a 3, and
the cruiser armor is 8 for its vitals and 4 for its upperworks. The target also
has a Poor Upperworks protection rating. Assuming the firing ship scores
a hit zone by guessing the correct range, it rolls four dice – one for
each gun. If the hit die results are a 2, 2,
3 and 5, only one round is eligible to cause damage
by hitting the upperworks. The player rolls again on the 50> column of the
Upperworks section with a plus one (+1) to the die roll because the target ship
has poor upperworks protection. This is because the penetration was a 3 and the
upperworks armor was a 4. Meaning the armor was too thick for the shell to
penetrate, but the poor rating meant that the existing armor did not have very
good coverage. A damage die roll of 4 would go to a
5, causing one T hit. If the damage die roll were a
5, it would go to a 6, causing one S
hit. |
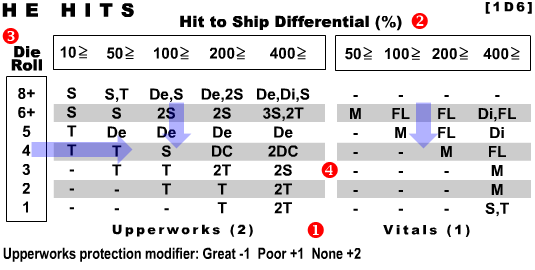 HE Hits Table –
Outline HE Hits Table –
Outline
This table is used for high explosive (HE) incoming rounds.
Resolve these shell hits by rolling one six sided die for each round. Each
1 result is considered to hit the Vitals of the target, all
2 results are considered to hit the Upperworks of the target.
Once all hits are established, compare the size of the incoming round
to the size of the target vessel. The resulting percentage variation or Hit
to Ship Differential is then cross referenced with a second set of die roll
results – one roll for each upperworks and vitals hit – to arrive at
the Hit Codes in the body of the table. The hit codes are then added to the
ship's log.
HE Hits Table – Details
Hit
Dice: Once a player has guessed the correct range to an enemy ship and
scored a hit zone, one six sided die is rolled for each incoming round to see
which ones struck the target. These should be rolled for in sets according to
ship and shell size; for example, if a ship lands four main rounds and seven
secondary rounds into a hit zone, roll one set of four dice for the mains, and
another set of seven dice for the secondaries (fourteen secondary dice if the
secondaries have an ROF of two). Hit roll results of 3 through
6 are considered to have exploded harmlessly in the water, dudded
or to have struck portions of the ship not critical for game play. Each
2 result is considered to hit the Upperworks of the target, all
1 results are considered to hit the Vitals of the target. The
lower portion of the table (number one) acts as a brief guide to remind
players which incoming round die rolls count as Upperworks hits (2) and which
count as Vitals hit (1). Only those rounds which hit vitals or upperworks are
eligible to cause further damage to the ship. Note that the Fast Play
combat chart increases the incidence of hits by changing the upperworks/vitals
die rolls from a 1 and 2 to a 1,2 and 3,4 respectively.
Hit
Columns: All results are based on the percentage difference between the
size of the striking shell and the size of the target vessel. This is called
the Hit to Ship Differential. So for example if the striking round's
size is one-tenth or more of the of the target vessel's size, use the 10
percent or greater column to check for damage. If the striking round's size is
equal to or greater than the target vessel's size, use the 100 percent or
greater column. The column used must always correspond to the part of the ship
that was hit: Upperworks or Vitals. Those rounds with a size rating less than
ten percent of the target vessel's size rating cannot do any
damage.
Damage Dice: Once the correct Hit to Ship
Differential column (number two) is established, roll one six sided
die (1D6) for each striking round. Cross index each modified die roll result
under the Die Roll column (number three) with the previously established
Differential column to find the code(s) for the damage inflicted (number
four).
Modifiers: Upperworks hits may end up being
modified by the Upperworks protection rating assigned to each ship.
Vessels which have Great, Poor or None upperworks protection ratings will have
damage dice against them modified by the amounts shown at the bottom of the
table. Hence any player rolling for upperworks damage against a ship that has a
Great rating will suffer a minus one (-1) to all upperworks damage dice. These
modifiers never apply to hit dice or any vitals damage dice. The
None protection modifier may result in a modified roll result of 8,
which is why there is an "8+" line on the chart.
Shell Hit Example #1: Four
30cm guns with a size rating of 60 onto a battleship with a size rating of 55
(note that range does not affect HE impact values). Assuming the firing ship
scores a hit zone by guessing the correct range, it rolls four dice – one
each for the four main guns. The die results are a 2,
5, 5 and 6. Two hits are against the
target upperworks and one is against the vitals. This means that the players
would check for damage effects by rolling once on the 100> column of the
vitals portion of the table and twice on the 100> column of the upperworks
portion of the table.
If the final hit die rolls were a 1
and a3 for the upperworks hit and a 4 for the
vitals hit, the target battleship would suffer one tertiary position damaged.
The tertiary damage was caused by one of the upperworks hits. No damage
occurred from the vitals hit, which is predictable given the less effect high
explosives will have against armored areas of a ship.
Shell
Hit Example #2: Four 20cm guns with a size rating of 18 onto a cruiser
with a size rating of 35. The target also has a Poor Upperworks
protection rating. Assuming the firing ship scores a hit zone by guessing the
correct range, it rolls four dice – one for each gun. If the hit die
results are a 2, 2, 3 and
5, only one round is eligible to cause damage by hitting the
upperworks. The player rolls again on the 50> column of the Upperworks
section with a plus one (+1) to the die roll because the target ship has poor
upperworks protection. A damage die roll of 4 would go to a
5, causing one GDe hit. If the damage die roll were a
5, it would go to a 6, also causing one S
hit. |
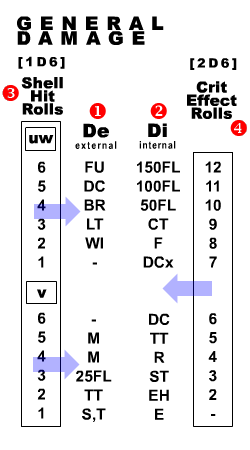 General Damage Table – This
table is used to cover low-odds hits and damage to external and internal areas
of a ship. External general damage hits (De) are listed in the left-center
column (number one) and internal general damage hits (Di) are listed in
the right-center column (number two). General Damage Table – This
table is used to cover low-odds hits and damage to external and internal areas
of a ship. External general damage hits (De) are listed in the left-center
column (number one) and internal general damage hits (Di) are listed in
the right-center column (number two).
The far left column
(number three) shows the die rolls that need to be made as a result of
AP and HE shell hits. The upper half of the table is used for Upperworks (uw)
hits and the lower half of the table is used for Vitals (v) hits. Note that
general damage suffered as a result of upperworks shell hits and vitals shell
hits are conducted as two different rolls, each of which use 1D6.
The
far right column (number four) shows the die rolls that need to be made
as a result of Critical Effect rolls. Note that general damage suffered as a
result of critical effect hits always uses 2D6 and cover both upper and lower
halves of the tables.
General Damage Example #1: An
upperworks damage roll causes one Di hit. Roll one six sided die and cross
index the corresponding number under the UW column with the Di -
internal column and apply the resulting hit code to the ship in question. A
die roll result of 3 would cause a CT hit. A die roll result of
6 would cause a 150FL hit.
General Damage Example
#2: A vitals damage roll causes one De hit. Roll one six sided die and
cross index the corresponding number under the V column with the De -
external column and apply the resulting hit code to the ship in question. A
die roll result of 3 would cause a 25FL hit. A die roll result of
6 would result in no hit unless the die roll were modified by an optional
rule.
General Damage Example #3: A critical effect roll causes
one De hit. Roll two six sided dice and cross index the corresponding number
under the Crit Effect Rolls column with the De - external column
and apply the resulting hit code to the ship in question. A die roll result of
10 would cause a BR hit. A die roll result of 5 would cause an M
hit. |
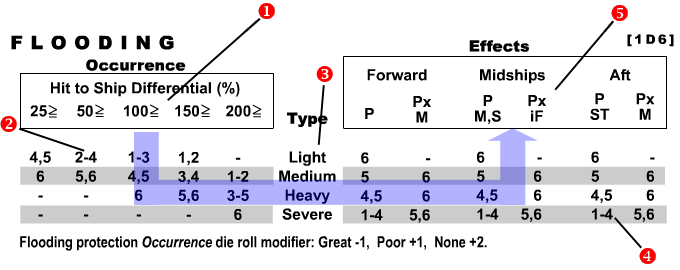
Flooding Occurrence – Compare
the size value of a weapon against the size value of its target. The resulting
percentage is used to establish which column to use on the Occurrence half of
the table (number one). As with the other hit tables, all percentages
are grouped on an equal to or greater than basis. The numbers in each
Occurrence column (number two) are the modified die roll values needed
to inflict the corresponding flooding types shown in the center of the table
(number three). Make sure to apply any appropriate flood protection
modifiers as required before consulting the table. The flood protection
modifiers are based on the flood protection values for ships, one of which
should be supplied for each vessel fighting in the game. See the ship
statistics and ship log for more information about ship's flood protection
values.
Modifiers: Flooding Occurrence die rolls may end up being
modified by the Flooding protection rating assigned to each ship.
Vessels which have Great, Poor or None flooding protection ratings will have
damage dice against them modified by the amounts shown at the bottom of the
table. Hence any player rolling for damage against a ship that has a Great
rating will suffer a minus one (-1) to all occurrence die rolls. Flooding
protection modifiers are never applied to the Effects die
rolls.
Effects: If a particular flooding type results from the
occurrence die roll (Light, Medium, etc) consult the Effects portion of the
table and roll one more die, cross indexing the flooding type with the
corresponding forward, amidships or aft area of the ship effected (number
five). If the unmodified die roll result falls within the number ranges for
the corresponding effects column (number four), apply the hit code(s)
shown immediately above.
Flooding Example #1: A size 60 shell
strikes a size 55 battleship and scores an FL result. Because the size of the
shell is one-hundred percent or greater than the target vessel, a die is rolled
on the 100> column with a modified result of 5, causing medium
flooding on the battleship. After randomly assigning the location of the
flooding to the aft section of the ship, another die roll is made on the Medium
flooding line with a 4 result, causing one Propulsion hit and one
Steering hit on the target. Note that a shell may not inflict any flooding if
its size rating is less than one-quarter of the size rating of the target
vessel.
Flooding Example #2: A size 22 round hits a size 30
armored cruiser and scores an FL result. Because the size of the shell is fifty
percent or greater in value compared to the target ship's size, a die is rolled
on the 50> column. On a modified die roll of 1, no result
occurred.
Flooding Example #3: A size 120 torpedo hits a size 30
cruiser. Because the size of the torpedo is two-hundred percent or greater in
value compared to the target ship's size, a die is rolled on the 200>
column. A modified die roll of 6 results in severe flooding.
Randomly locating the hit in the port side of the ship, one more die roll is
made with a result of 5. Cross indexing the Severe line and the
Midships column, the result is a destroyed propulsion box and an internal fire.
|
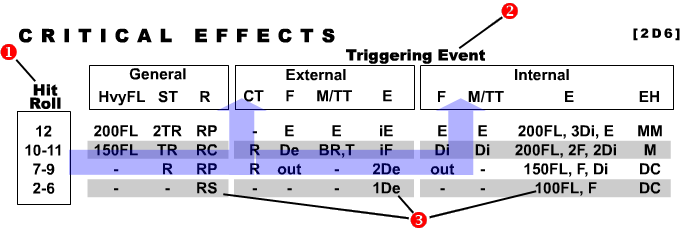
Critical Effects Table –There
are two types of critical effects; cyclic and static. Cyclic effects are part
of the basic fire and flood rules. Their ongoing presence on board a vessel
constantly threatens to trigger more damage. Static effects are damage events
which cause various types of specific damage all at once without any further
need for tracking effects. Explosions, electric/hydraulic damage, steering
malfunctions and complications to main armament/torpedo hits all constitute
static critical effects.
To conduct a critical effect test, roll two
six-sided dice (2D6) and cross-reference the total (number one) with the
appropriate Triggering Event column (number two). Apply the
results (if any) called for at the corresponding cross-index point in the hit
code field (number three). Note that damage caused by a single critical
effect can trigger a long string of damage events, resulting in several
critical effect die rolls for various types of damage. See the damage key table
(below) and rule section 4.1 for
definitions of the triggering event and critical effect damage codes shown on
this table.
Critical Effects Example #1: A ship
suffers a penetrating (100>) armor piercing M hit. Using the triggering
event column for Internal > M/TT as a starting point, the player
rolls 2D6 with a result of 12, causing an E hit (explosion) on
the adjoining column of the Internal triggering even table. The player
rolls again for explosion effects, with a die roll result of 7
which causes a fire, an internal general damage hit and a flooding hit
automatically valued for the 150> column on the Flooding Occurrence
table (remember to modify the die roll with the Flood Protection
modifier). |
| Damage Key Reference – The damage key
gives a brief definition of each damage or hit code called for within the
various tables used on the combat chart. For broader definitions and
instructions for use, see Damage & Sinking section
4.1 |
Listing & Sinking Table
Listing:
Vessels which experience uneven flooding (different flooding point values on
opposing sides or ends) are subject to increasingly severe side effects. Take
the total difference in points of flooding (if any) between opposing vessel
compartments and cross index this Point Difference with the type of the
flooding. The two types of uneven flooding are Port/Starboard or Fore/Aft,
which reflect the two sets of opposing hull compartments present on each
vessel's ship log. The resulting damage hits that result from this cross
reference are cumulative and remain in effect until the vessel sinks or the
point difference is reduced by counter-flooding or new damage. Note that damage
hits inflicted specifically as a result of uneven flooding may not be repaired
directly by damage control dice. But as noted above, the effects will be
eliminated or incrementally reduced if the uneven flooding condition is
eliminated or reduced through other damage control steps such as
counterflooding, etc.
Sinking: All vessels with a total of five
or more points of flooding on board are required to roll once each turn for
sinking. Locate the value on the Total FL Points column which matches
the total flooding points present on a vessel and roll two six-sided dice. If
the die roll result is equal to or higher than the corresponding number shown
in the Sink Roll column, the vessel has begun to sink. The column at
right indicates how long the vessel will take to sink if this occurs. See the
Sinking & Listing portion of rules section
4.0 for more information . |
| Turn Cycle Reference – The turn cycle
shows the order in which commanders issue orders, move their vessels, use
ship's weapons and track damage. See the rules section
1.4 Turn Sequence for more
information. |
DC & Command Actions Table
Command
Actions: The Command Function portion of this table indicates the
various command related tasks available to each ship. To the right of each
function is shown the minimum die roll value needed on one six-sided die (1D6)
in order to that function to succeed or be carried out. Note that in the case
of reading signals the modifier for BR hits is cumulative: Modifiers for BR
hits (if any) on both the signalling vessel and on the intercepting vessel are
combined and applied to an interception die roll.
Damage Control:
The Repair Function portion of this table indicates the various repair
attempts that may be attempted using a vessel's existing damage control (DC)
dice. To the right of each repair function is shown the minimum die roll result
needed on one six-sided die (1D6) in order to that repair to succeed. Note that
each damage slash on a ship's log requires a separate repair die roll, multiple
damage slashes cannot be fully repaired with a single damage control die roll
and destroyed features may not be repaired under at all during a
game.
The left side of the table includes a short outline of important
modifiers and restrictions which apply to the command and/or repair die rolls.
The most important is the note limiting repairs attempts to one die roll per
hit. This means for example, that if a ship feature has two damage hits on it
(let's say two damage slashes on a Main gun position) the commanding player can
only roll two DC dice on any one turn while attempting repairs. He could not
pile six DC dice onto the one disabled position in an attempt to fix it. |
Torpedoes Table – Summary: The Torpedo
Hit Chart cross-indexes the relative courses of the launching and target
vessels with the orientation of the target. The resulting value is that
required to score a hit using three six-sided dice (3D6).
Torpedoes
Table – Details: Begin by establishing whether the combined courses of
the launching ship and its target are converging or diverging. Two vessels are
converging if their combined courses are carrying them toward each other. If
either vessel is moving away from the other in any way, they are considered to
be on diverging courses. A good way to establish this is to look at the
miniatures and see if they are pointing toward or away from each other. If
either model points away from the other, however slightly, then it is a
diverging course.
Once the combined course has been decided, establish
whether the angle of the target vessel is a rake "shot" or a beam shot. A rake
angle means the target vessel has its bow or stern wholly or partially pointed
toward the launching vessel. A broadside angle means that the target vessel is
substantially presenting its side to the launching vessel. Any torpedoes fired
from within a target vessel's front or rear arc is considered a rake shot. A
beam shot is any torpedo fired from within either of a target vessel's beam
arcs. Once these two factors are established, roll the dice and modify them
using the appropriate modifiers defined below.
Die Roll
Modifiers: All die roll modifiers for firing torpedoes are cumulative. Note
that unlike the other tables on the Battlefleet 1900 combat chart, the torpedo
launch table requires the rolling of three six-sided dice (3D6) per torpedo.
DD/TB Firing: Add one point to the
hit die roll if the vessel launching the torpedo is a destroyer, torpedo boat
or torpedo gunboat.
Slow attacker & target: Add one point to the
hit die roll if the launching (attacking) vessel moved under half of its
original available speed during the current turn, and add another one point to
the hit die roll if the target (defending) vessel also moved less than half of
its original available speed during the current turn.
Stationary
target: Add two points to the hit die roll if the target vessel did not
move at all during the current turn. This modifier supersedes the Slow target
modifier above, both modifiers cannot be used in the same hit rolls. However
the Slow attacker modifier may still be used in conjunction with the
Stationary target modifier.
Choppy/Rough Seas: Subtract one
point from the hit die roll if the sea condition at the time of the game is
choppy. Subtract two points from the hit die roll if the sea condition at the
time of the game is rough.
Distance: Less than 10 Cables: Subtract
three points from the hit die roll if the distance to the target vessel is
greater than five cables, out to the maximum torpedo range of 10 cables. A
cable is a nautical unit of measure. The game distance for one
cable is available on the Scale Sheet and can
be marked on the combat chart under the Torpedoes table.
Distance: Less
than 5 Cables: Subtract one point from the hit die roll if the distance to
the target vessel is greater than two cables, and equal to or less than five
cables.
Distance: Less than 2 Cables: Apply no range modifiers to the
hit die roll if the distance to the target vessel is equal to or less than two
cables.
|
| Positions Reference – This reference box
presents a short overview of the various gun positions and armament layouts
available to the many different ships of the period. The diagram shows the
basic turreted position codes and their respective arcs of fire as well as the
basic arc of fire values for the various sponsoned and casemated beam patterns
commonly used for secondary armaments. For more details see the Positions
portion of section of 3.1 Targets
and Positions. |
|
|